
You can start a process through a web service call, which is performed by another application. It’s possible using the HEFLO Web Services Connector.
Step 1 – Include a message initiator
Before adding the initiator, make sure that the process has the automation feature enabled. Click on properties tab at the right side, select the General, and activate “Automated Process”.
To instantiate the process include a initiator with the message trigger.

- In the process editor, locate the “Start” element in the BPMN Toolbox
- Within the item “Start” drag the item called “Message” to the drawing area or process lane.
- Select the message initiator and go to the properties tab at the right side.
- In the “Connector” field, select “Web Service.”
- Complete the process modeling.
Step 2 – Configure parameter passing
Parameters are data provided by the third party program and are handled in your process. Here’s how to trigger the dialog that does this setup:
- Select the message initiator.
- In the properties tab on the right side, click on “Configure Web Service.”
- In the web service configuration dialog, we can configure the mapping of the parameters provided by the web service to a process field. If you want to display the content of these fields, just add a form and include them as read-only fields.
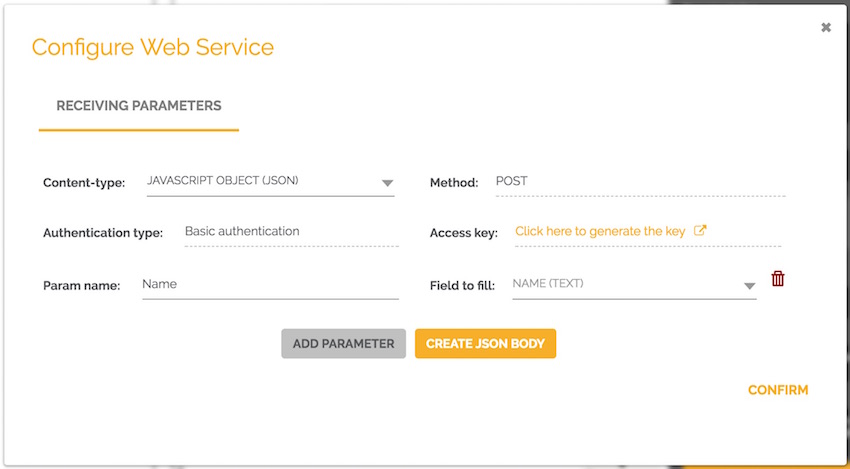
Repeat the procedure below for each parameter provided by the calling program.
- Click “Add Parameter.”
- Under “Parameter Name,” enter the name provided by the calling program in JSON content.
- In “Field” select an existing field in the process.
Once the parameter configuration is complete, click “Confirm.” In this way, the initiator properties tab is updated, and the web services test URL is shown. You can use this address to make test calls and generate test work items without impact on the production database.

Step 3 – Generate an API key
The API key is generated on the Environment Management page. Follow the steps in the API key generation procedure or use an existing one.
Step 4 – Testing
To perform tests you can use a test version of the calling program or, in the absence of it, an application that posts HTTPS requests such as Postman.
Also, to facilitate the tests there is a button in the configuration dialog called “Generate Body JSON”, which copies to the clipboard a JSON content with the same structure as the parameter configuration.
After performing all the tests, select the initiator again and get the production URL in the properties tab. Update the definitive caller program with this URL and publish automating. The production URL is not valid at this time, but you can get it and update your program.
Step 5 – Publish automation
After completing all the tests, publish the process:
- Select the actions tab at the right side of the process editor.
- Click “Publish Automation.”
Once published, the process stops displaying the test URL and displays only the production URL.
See also: