
In this article we will see how to configure a process to send a document to be signed on DocuSign.
We use this example process to demonstrate this configuration:

When the user creates a work item for this process, he must first insert the desired document(s) into a “Files Upload” field in the first task. When he moves on to the next task, the system then sends information to DocuSign, which is called an “envelope”. The work item then waits to receive information from DocuSign. Depending on the status of the relevant document, the work item will follow one of 3 different exclusive gateway output flows. Each of the three tasks following the gateway aims to display the document and its associated status in DocuSign.
Configure an envelope creation and sending task
The first step is to configure the task that will create the envelope and send it to DocuSign. The objective is to configure the document that will be sent, the list of recipient(s) and personalize the message that will be sent by DocuSign.
- Select the relevant task.
- Make sure this is a message type task with throw behavior. For information: the envelope sending configuration is only possible for message type tasks, it is not possible to use a message sending event.
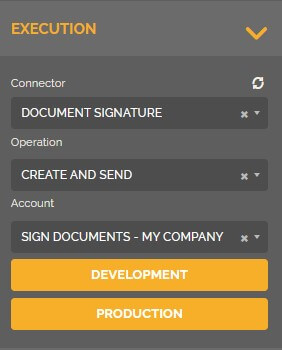
- Go to the properties and choose the connector: “Document signature”.
- Choose the “Create and send” operation.
- In the account section, choose the DocuSign account associated with your HEFLO environment. To learn more about how to associate a DocuSign account with your HEFLO environment: Configure DocuSign integration.
From this moment, two new buttons appear:
- The “Development” button allows you to configure the creation and sending of the envelope for test work items.The “Development” button is linked to the DocuSign developer account associated with this environment.
- The “Production” button allows you to configure the creation and sending of the envelope for production work items once the process automation is published. The “Production” button is linked to the DocuSign account associated with this environment.
We will now configure the creation and sending of the envelope.
- Click the “Development” button.
- In the “Envelope” tab you must:
- Give the envelope a name.
- In the “Documents” section, select the field that will contain the document that will be sent by DocuSign. You must select the field used in the first task to upload the document(s). You can also choose to select a document template contained in the DocuSign account associated with your HEFLO account. To find out more : Send a DocuSign document template to sign.
- In the “Store Folder” section you can choose in which folder of your DocuSign account the document will be sent. If you do not select any folder, your envelope will automatically be stored in the drafts folder.
- In the “Recipients” tab you must add one or more recipients by clicking on the “+” button. You must then choose a role from those available in DocuSign, a name and an email address. You can also choose a routing order, this is useful if, for example, you want this recipient to receive the document to be signed before or after other recipients. You can also set up a code to access the document and send a private message.
- In the “Message” tab you must configure the name and body of the message that will be sent to all recipients.
Then click on confirm to validate this configuration.
Configure an envelope receiving task.
We will now configure the envelope reception task.
- Select the relevant task.
- Make sure this is a message type task with catch behavior. For information: the envelope reception configuration is feasible for message type tasks and for message reception events.
- Go to the properties and choose the connector: “Document signature”.
- Choose the “Await envelope” operation.
- In the “Envelope Status Field” section, choose the HEFLO field that will retrieve information regarding the status of the envelope in DocuSign. This field must be of “Text” type. When the envelope sent has received action from all the recipients (in the case where the document(s) contained in the envelope have been signed), or one of the recipients (in the case where they have been declined), then this selected field will receive the final status of the envelope. There are three statuses: completed, voided and declined.
- In the “Final Combined File” section, choose the HEFLO field that will retrieve the final document contained in DocuSign. This field must be of “Files Upload” type.
- Then click on the chain icon and select the task of creating and sending the envelope,
so that the system knows which envelope this task is associated with. After selecting the creation and sending task, you can then find this information under the chain icon. We advise you to name these tasks well so that you can differentiate them in case you have several envelope creation and sending tasks.
In our example, we want the work item to follow an output flow based on the status of the document in DocuSign.
- Select the exclusive gateway, go to the properties and activate the “Is automatic” option in the execution part.
- Create a business rule for each output flow using the field chosen in the “Envelope Status Field” section when configuring the task or message reception event. For information: whatever language you use in HEFLO, the DocuSign statuses are in English: “completed”, “voided” and “declined”.
- In each of the tasks following the gateway, add the two associated fields when configuring the task or message reception event for the “Envelope Status Field” and “Final Combined File” parts. The goal is to display the status and final document contained in DocuSign.
Create a test work item.
The setup is now complete, we will create a test work item.
Add the desired file to the first task field.
The task of creating and sending the envelope is transparent to the user. In our configuration, the work item then goes directly to the DocuSign message waiting task. This is then blocked for the message reception type task. Once the envelope is created and sent, the recipient(s) receive an email. The recipient concerned must then follow the instructions explained by DocuSign to sign or decline the document concerned. The action that will be carried out by them will allow the instance to advance automatically and choose the output flow according to the status of the envelope.
For information: Once the envelope has been created, you can see the information concerning it.
- Click on the button with the three dots.
- Click on “Document Signature”.
- You then have information concerning the status of the envelope and the actions pending or taken by the recipient(s).
You can also access this information if you are on task waiting for information from DocuSign. You can then click on “View details”.
We will sign the document.
Both recipients in our example signed the document. The work item then follows the “completed” output flow and we can find the document status and signed document in the task following the gateway.
Configure the “Production” part and publish the process automation.
Once the test has been validated, you must then make this same configuration in the “Production” part of the envelope creation and sending task. We advise you to create the same template on your two accounts, the DocuSign developer account and the DocuSign production account, to facilitate the configuration of the “Production” part on HEFLO.
Once configured, you can then verify your process using the validation function in the “Actions” tab and publish the process automation.