
The objective of this article is to clarify the differences and usage of web services and HEFLO’s API project. This will help you better automate your BPMN process, extracting the most of it without overcomplicating or misallocating resources.
Before introducing the specific HEFLO features, it is important to understand the difference between traditional web service integrations and API customizations.
A web service is a communication mechanism, usually based on REST or SOAP protocols, used to exchange data between systems. In practice, it allows one application to send or receive information from another application through predefined endpoints and structured requests and responses. These integrations can connect HEFLO to third-party systems developed either internally or externally. In HEFLO, a web service configuration typically requires a service URL, optional path or query parameters, authentication settings, and the request or response data mapping used during the process automation.
API Customizations, on the other hand, are designed to implement custom business logic and advanced automation scenarios. Instead of simply exchanging data, an API customization allows developers to create projects that manipulate process information programmatically, apply validations and calculations, integrate multiple services, transform data, or execute complex decision logic. These projects can be developed either by the customer team or by HEFLO’s team and use prebuilt functions and APIs provided by the platform to communicate directly with automated processes through context objects, request parameters, and response payloads. Additionally, API customizations can be executed and debugged locally during development and later deployed to external servers or serverless environments for production use.
In summary, web services focus primarily on system-to-system communication and data exchange, while API customizations provide a programmable layer that enables advanced automation behavior, custom processing logic, and deeper integration capabilities.
What are HEFLO Web Services?
On HEFLO, web services work based on REST protocol and data transfer via json. Its main objective is to allow data exchange between applications developed by third-party and/or the user. BPMN elements like Task and Events; External Data Fields or Action Buttons can also be used by web services to Search, Send and Receive data with slightly different configurations.
Typical usage for this setup includes third-party API to get public records such as postal code, business or exchange rate information; third-party automation, like zapier, that can use webhooks; and company’s custom API or integration to ERPs, and other.
What are API Customizations?
Meanwhile, HEFLO offers an API project based on nodeJS that has built-in functions that allow the user to perform complex business rules or logic to manipulate data. In addition to BPMN elements, External Data Fields and Action buttons, we can also use the project to work on Form Fields via the Initialization, Add, Change and Remove operations; call the API during the execution flow, define participants and work with custom records – creation, update and remove. A complete list of built-in functions and triggers can be found in our API documentation: Link
Advantages and limitations
From the summary above, we can already see the advantages and disadvantages of each approach. Web services are typically used when no complex business logic is necessary and the focus is only the data transfer. Input and outputs parameters are set by the documentation and are generally fixed, those must be recovered from the JSON using object property access ( or JSON path navigation), such as, data[0].parameters.name and mapped to a target field. Other scenarios include generic company’s API that implements business logic, but are consumed by different services and, therefore, works with JSON data and middle man application to allow the communication between HEFLO and other systems. All of these are “static” in the way that the final user is just a consumer but do not require programming skills, maintenance and/or hosting capacities.
HEFLO’s API customization allows access to all the features of a web service, but with access to built-in function that allows specific data operation, data manipulation via alias and much more, but has the drawback of the need of programming in nodeJs, maintenance and host. It is worth noting that HEFLO offers a consultant service or implementation service for such situations – talk with our Sales team to know more.
Typical integration and automation use cases
Independent of the integration method choice, first, we need to set up the service configuration. For this:
- In your HEFLO’s environment, access the process editor.
- On the top menu, click on the view editor tools (eye icon).
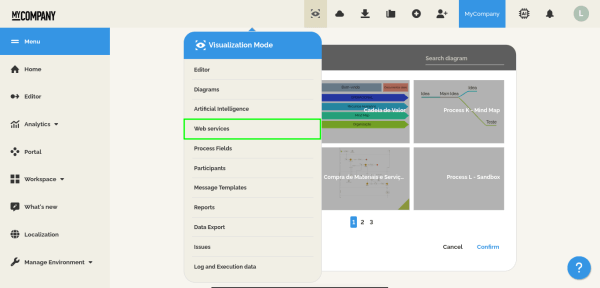
- Select the Web Services option.
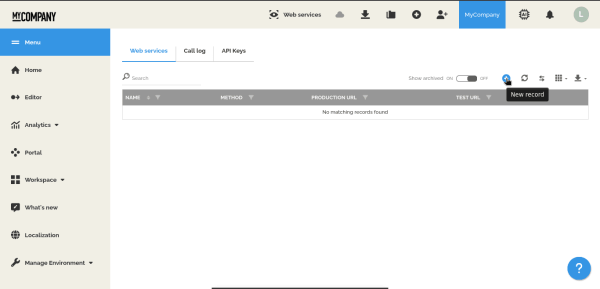
- On the web services tab, click on create a new record (plus icon).
- On the Web service configuration page, fill the required fields, based on your setup.
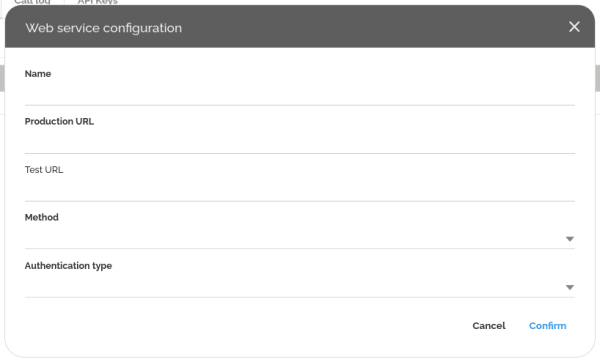
- Name – Used to easily identify the service used.
- Production URL – The url used to call the service, do not insert the function path here, this is used later.
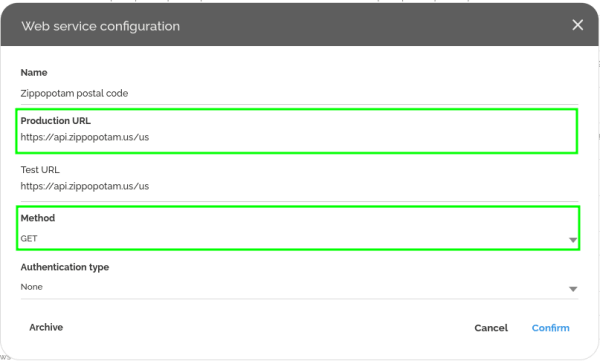
E.g.: Postal Code API, such as, Zippopotam requires the following url to execute a search:
https://api.zippopotam.us/us/90210
In this step, we only insert the initial part or the url, without the parameters:
https://api.zippopotam.us/us/ - Test URL (Optional) – Typically is the same as the production url.
- Method – Define if the call is for “reading” or “writing”.
- Authentication type – Type of authentication used by the service.
For services or applications that perform specific operations, like database queries on HEFLO environments, or where an additional layer or protection is required, we can define an API key and use it to enforce validation before each call. To generate a new API Key, go to the API keys tab in the Web service page and:
- In the API Keys tab, click the Add New Key (plus icon).
- If the MFA is configured, you will be required to enter your Authenticator Code.
- On the configuration screen, you can define a friendly name for it.
- Close the window to automatically trigger the download of the key file.
Once the key is generated, it is kept in our server with an irreversible key. This means that it is not possible to remember the password, and if you lose this password you will need to regenerate the key and perform maintenance on all the calling programs maintained by you.
Note that this isn’t the only method to create the configuration or the key, both can be set directly on the BPMN element, form field or action, and on the participant definition.
Web services configurations
In this section we will demonstrate how to configure a web service call for two different scenarios, the usage of a third-party service and a custom API project. Note however, that additional documentation for other case scenarios can be found in our Knowledge Base: Link.
Case 1: Third-party service – US postal code using Zippopotam
The objective of this setup is to extract some postal code information (country, state, city) based on a given postal code. This is a typical usage of the web service configuration, where the user knows the expected inputs (requests) and outputs (response).
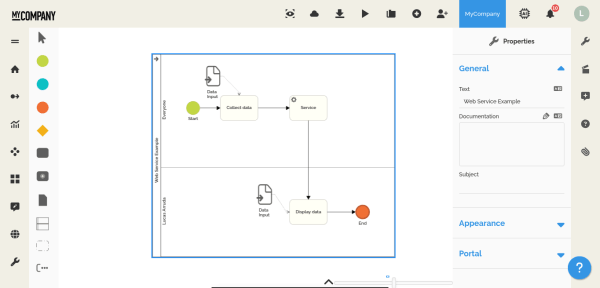
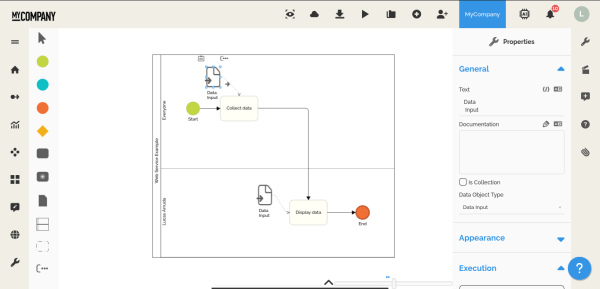
We can model this call using a service task that reads the postal code from the task “Collect data”, performs the request to collect the postal code information, and displays the information on the “Display data” task. An alternative approach is to use an action button inside the form to perform the request, this eliminates the web service task and can be useful in scenarios where it must be viewed by the user immediately.
To configure this use case, first:
- From the HEFLO’s environment main page, access the process editor.
- Open an existing BPMN process, or create one from scratch.
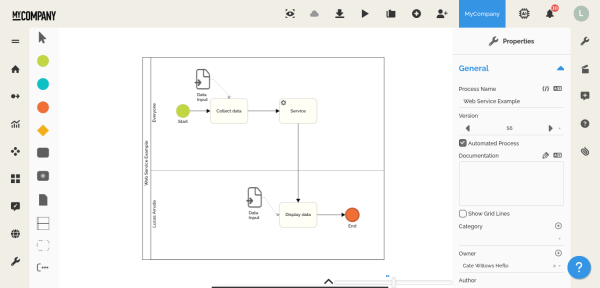
- Check if the process has the Automated process option enabled.
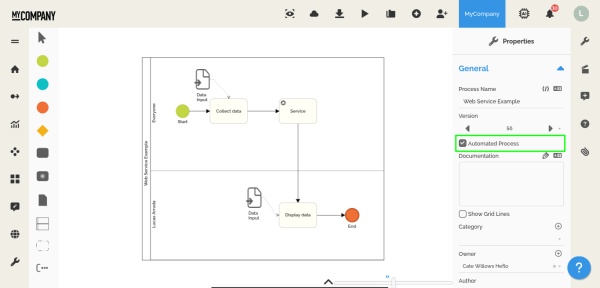
- Add the start element, “Collect data” and “Display data” tasks, the service task and end element as shown in the image below.
- On the “Collect data” task, link a data input (form).
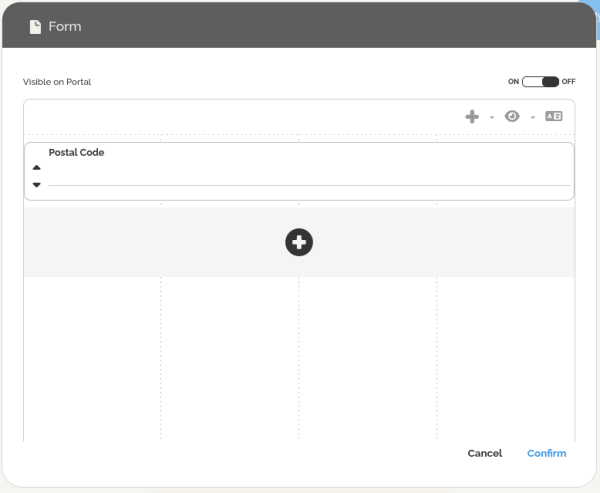
- Double click on the form to access the form creation window.
- Inside it, create a text field called “Postal code” and make it required.
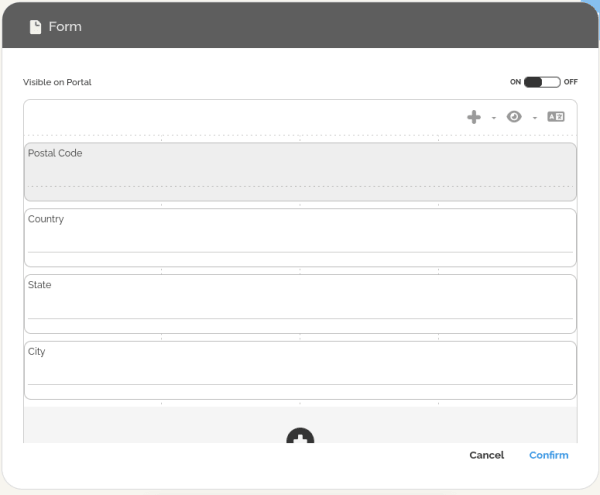
- Do the same for the “Display data” task, creating also the following text fields:
a. County;
b. State;
c. City.
- On the service task, click on the properties menu (right-side) and locate the section Execution.
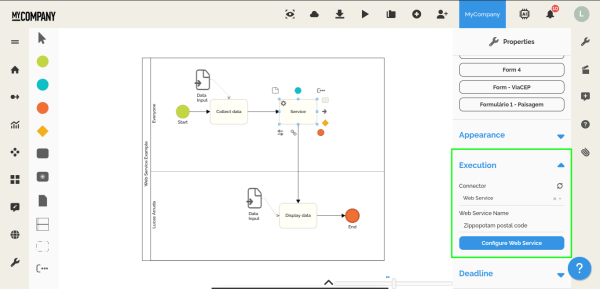
- Set the connector type as Web service.
- Click on the Configure web service button to open the configuration window.
- Here we need to configure the web service call and define the sending and received parameters.
For this example, the input parameters are sent directly inside the url, so we do not use the Sending parameter tab, just copy the configuration below.
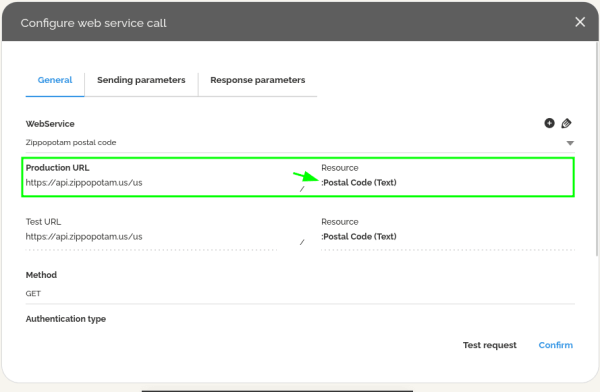 For more details on how to correctly define the “Production URL” and “Resource”, please consult the web service documentation.
 - In the response tab, map each received parameter to the target field.
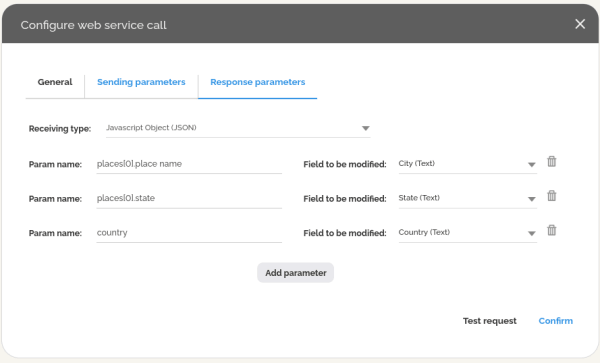 Note that this step requires knowledge of object property access, alternatively, you can use online solutions, such as, JSON path finder to easily identify the correct data path.
 - Save the configuration.
- On the editor, right-click on the start element and select Test, then Start new work item.
- Validate the configuration.
Note: Sometimes the response JSON has a different format than the expected, so some adjustments may be necessary. Be sure to always test before publishing the process.
Case 2: Custom API project
The objective of this setup is to simulate a company’s internal API that can be used to perform business rules not using the built-in HEFLO function or data transfer between applications, in this case, compute the total cost based on the department, number of installments and cost per month. Since the idea here is to present the BPMN process configuration, we will briefly cover how to create and deploy a project based on:
- Node.js + Express API;
- Expose it publicly using ngrok.
A minimal knowledge of both are required to perform adjustments and debug, however, following the steps this guide will give you access to a simple API to test the web service configuration.
Note: All these steps are done using a terminal, such as the VScode terminal.
- Create the project directory.
a. Open terminal and run:
mkdir custom-api
cd custom-api - Initialize Node.js project.
a. Run:
npm init -y
This creates a package.json file. - Install dependencies:
npm install express
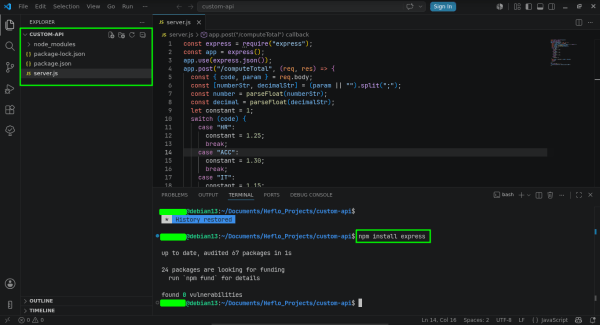
- Create the API file.
a. Create a file called server.js inside the directory.
b. Paste this content:
const express = require(“express”);
const app = express();
app.use(express.json());
app.post(“/computeTotal”, (req, res) => {
const { code, param } = req.body;
const [numberStr, decimalStr] = (param || “”).split(“;”);
const number = parseFloat(numberStr);
const decimal = parseFloat(decimalStr);
let constant = 1;
switch (code) {
case “HR”:
constant = 1.25;
break;
case “ACC”:
constant = 1.30;
break;
case “IT”:
constant = 1.15;
break;
default:
constant = 1;
}
const total = constant * (number * decimal);
res.json({
total
});
});
app.listen(4000, () => {
console.log(“Server running on port 4000”);
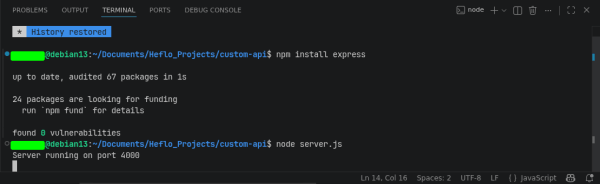
}); - Run the API locally.
a. Start the server.
node server.js
b. Expected output: Server running on port 4000.
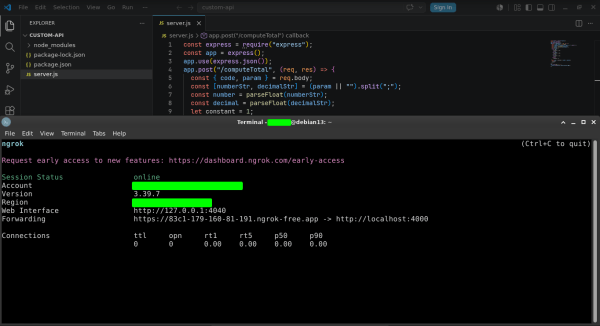
- After installing and setting up your ngrok, expose your local API.
a. Run this on a new the terminal:
ngrok http 4000
b. You will see something like:
Forwarding https://abcd-1234.ngrok-free.app -> http://localhost:4000
c. Your endpoint becomes:
https://abcd-1234.ngrok-free.app/computeTotal
- Keep both services running.
The next step is to create the BPMN process and configure the web service call, for this will be reusing the diagram presented on Case 1.
- From the HEFLO’s environment main page, access the process editor.
- Open an existing BPMN process, or create one from scratch.
- Check if the process has the Automated process option enabled.
- Add the start element, “Collect data” and “Display data” tasks, the service task and end element as shown in the image below.
- On the “Collect data” task, link a data input (form).
- Double click on the form to access the form creation window.From here the process became a little different:
- On the “Collect data” task, create three fields and set them as required:
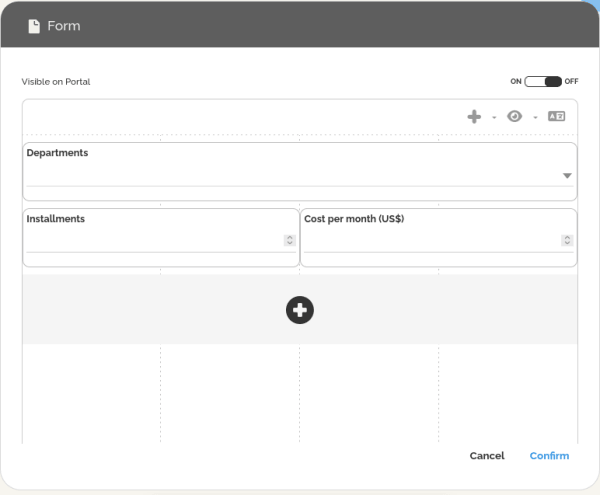 a. Department: Text field with options “HR”, “ACC”, “IT” and Other.
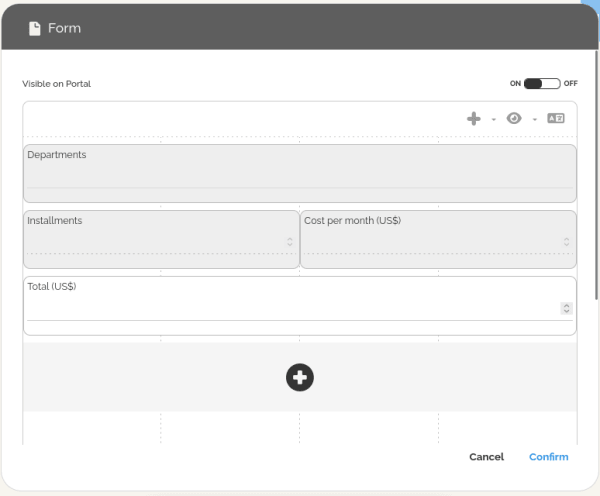
b. Installments: Number (integer) field;
c. Cost per month (US$): Decimal number field; - On the “Display data” task, create a decimal number field called “Total (US$)”.
- On the service task, click on the properties menu (right-side) and locate the section Execution.
- Set the connector type as Web service.
- Click on the Configure web service button to open the configuration window.
- Here we need to configure the web service call and define the sending and received parameters. For this, create a new web service and set:
a. Production URL: https://abcd-1234.ngrok-free.app/
b. Resource: computeTotal
c. Method: Post
d. Authentication: None
where the production URL must be the one shown in the ngrok terminal.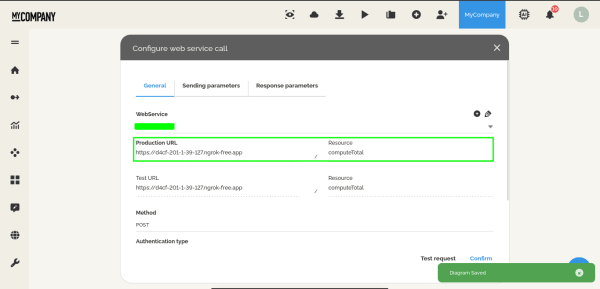
- In the sending parameters, we will map the form field to the expected inputs of the API, in this case, code and param. The idea here is to present the two possible approaches, a single field or multiple fields per input.
a. Param name: code Value: Department
b. Param name: param Value: :Installments;:Cost per Month (US$)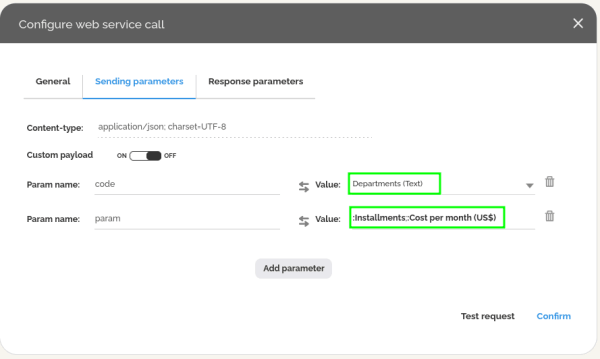
- Finally, the response tab will map the total to the form field “Total (US$)”.
a. Param name: total Value: Total (US$)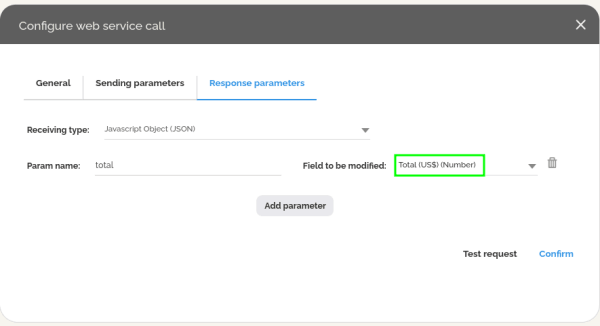
- Save the configuration.
- On the editor, right-click on the start element and select Test, then Start new work item.
- Validate the configuration.
It is important to emphasize that this approach uses a local project to simulate a company API already deployed and available online, therefore, this implementation will only work while the project is running.
HEFLO’s API configurations
This final section will demonstrate how to deploy a local HEFLO’s API project and use it in a simple BPMN process. For this scenario, will be implementing an API project that on a change of value in the field “Amount”, we will compute a new total after applying the taxes.
Additional documentation for other case scenarios can be found in our Knowledge Base: Link.
The approach here is similar to Case 2, where the idea is to present the BPMN process configuration. In this example, we will briefly cover how to create and deploy a lightweight integration API based on:
- Node.js + Express;
- HEFLO’s SDK;
- Public exposure using ngrok for HEFLO webhook integration.
Again, a minimal knowledge of these are required to perform adjustments and debug, however, following the steps this guide will give you access to a simple API to test the web service configuration.
Note: All these steps are done using a terminal, such as the VScode terminal.
- Create a project directory.
a. Open terminal:
mkdir heflo-api-project
cd heflo-api-project - Initialize Node.js project.
a. Run:
npm init -y
This creates a package.json file.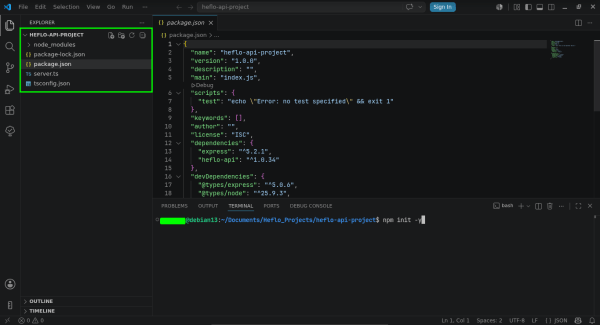
- Install dependencies
a. We need to install Express.js and HEFLO API SDK, for this, run:
npm install express heflo-api
npm install -D typescript ts-node @types/node @types/express
The HEFLO package provides event context handling for workflow customizations. - Create tsconfig.json
{
“compilerOptions”: {
“target”: “es2020”,
“module”: “commonjs”,
“strict”: false,
“esModuleInterop”: true
}
} - Create the API server.
a. Create the file server.ts inside the directory.
b. Paste the following code:
import express from “express”;
import * as HEFLOApi from “heflo-api”;
const app = express();
app.use(express.json());
app.get(“/”, (_, res) => { res.json({ status: “HEFLO API running” }); });
app.post(“/onChanged”, async (req, res) => {
try {
const context = new HEFLOApi.Events.WorkItem.OnChanged({ body: req.body });
const department = context.WorkItem.Get(“department”);
const amount = parseFloat(context.WorkItem.Get(“amount_uss”) || “0”);
let tax = 1;
switch (department) {
case “HR”:
tax = 1.25;
break;
case “ACC”:
tax = 1.30;
break;
case “IT”:
tax = 1.15;
break;
default:
tax = 1;
}
const total = amount * tax;
context.WorkItem.Set(“total_uss”, total);
res.json(context.GetModifiedData());
} catch (err: any) {
console.error(err);
res.status(500).json({
error: err.message
});
}
});
const PORT = 4000;
app.listen(PORT, () => { console.log(`Server running on port ${PORT}`); }); - Run the project.
a. Start server:
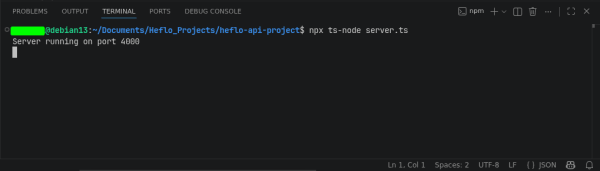
npx ts-node server.ts
Expected output: Server running on port 4000
- After installing and setting up your ngrok, expose your local API.
a. Run this on the terminal:
ngrok http 4000
b. You will see something like:
Forwarding https://abcd-1234.ngrok-free.app -> http://localhost:4000
Your endpoint becomes: https://abcd-1234.ngrok-free.app/onChanged - Keep both services running.
The next step is to create the BPMN process and configure the web service call, for this will be using a simplified diagram to display only the on changed event on the form field.
- From the HEFLO’s environment main page, access the process editor.
- Open an existing BPMN process, or create one from scratch.
- Check if the process has the Automated process option enabled.
- Add the start element, “Collect data” and “Display Data” tasks and end element as shown in the image below.
- On the “Collect data” task, link a data input (form).
- Double click on the form to access the form creation window.
- On the “Collect data” task, create three fields and set them as followed:
a. Department: Text field with options “HR”, “ACC”, “IT” and Other.
b. Amount (US$): Decimal number field;
c. Total (US$): Decimal number field;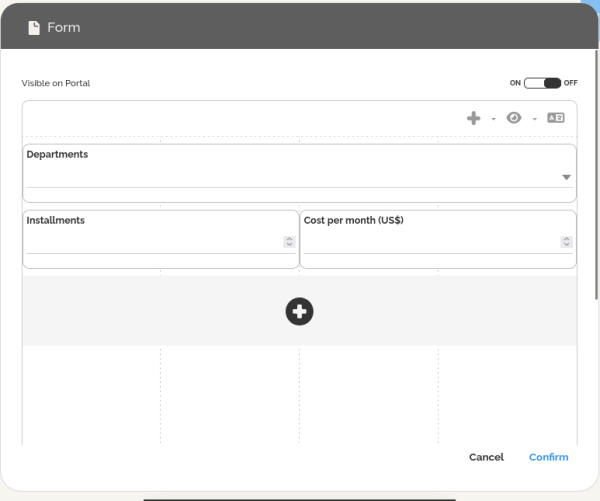
- Here we need to take an additional step and for that, we have two possible approaches:
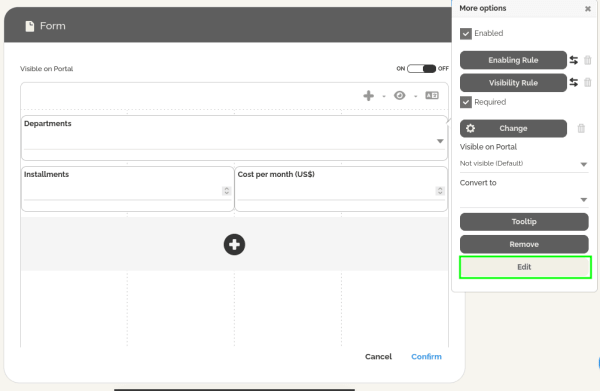
a. The first is to use the field identifier to map the form field inside the application, for this:
i. Click on the pencil icon on the right side of the field and select the option Edit.
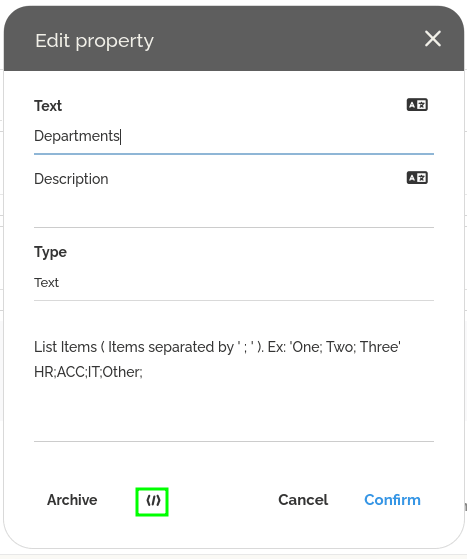
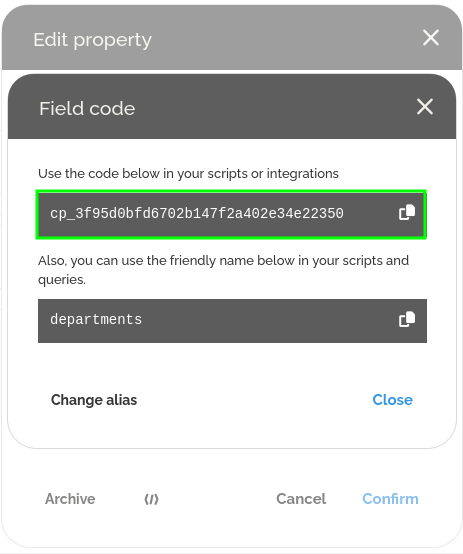
ii. At the bottom of the window, click on the icon “</>” to access the field identifier and replace field_id on the lines like:
context.WorkItem.Get(“field_id”);
context.WorkItem.Set(“field_id”,);
To map the field inside the application.
 b. The second is to create custom alias, this keep the API code simpler and maintainable, for that:
i. Click on the pencil icon on the right side of the field and select the option Edit.
ii. At the bottom of the window, click on the icon “</>” to access the field identifier.
iii. Select the option to create alias and confirm.
iv. Use these in place of field_id on the lines like:
context.WorkItem.Get(“field_id”);
context.WorkItem.Set(“field_id”,);
To map the field inside the application.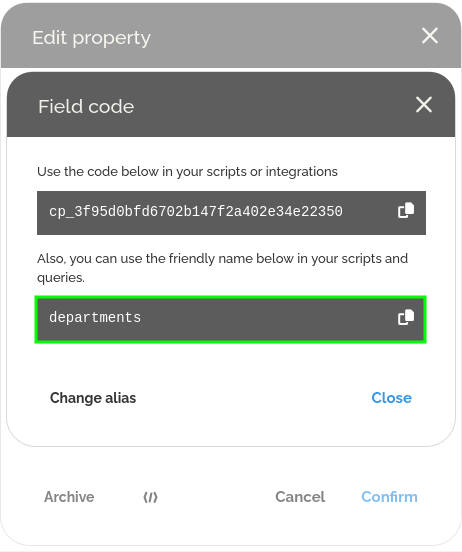 c. Create the following alias for each field, these must be the same used in the code.
Field: Department Alias: department;
Field: Amount (US$) Alias: amount_uss;
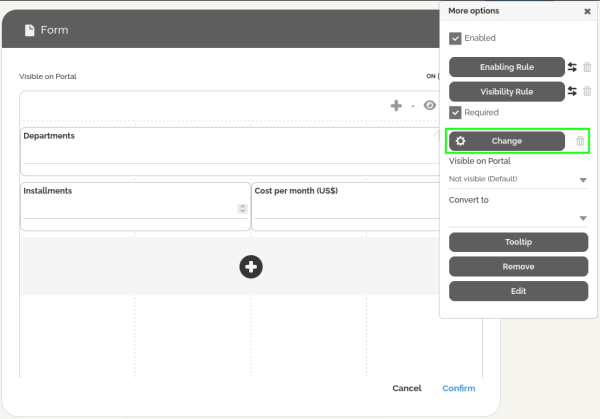
Field: Total (US$) Alias: total_uss. - Now it’s time to configure the api call, select the form field “Amount (US$)” and click on the pencil icon.
- Click in the option Change, this will configure the call event each time the field is changed.
- On type of customization, select API using NodeJS.
- Here we need to configure the web service call. For this example, create a new web service and set:
a. Production URL: https://abcd-1234.ngrok-free.app/
b. Resource: onChanged
c. Method: Post
d. Authentication: None
Where the production url must be the same shown in the ngrok terminal.
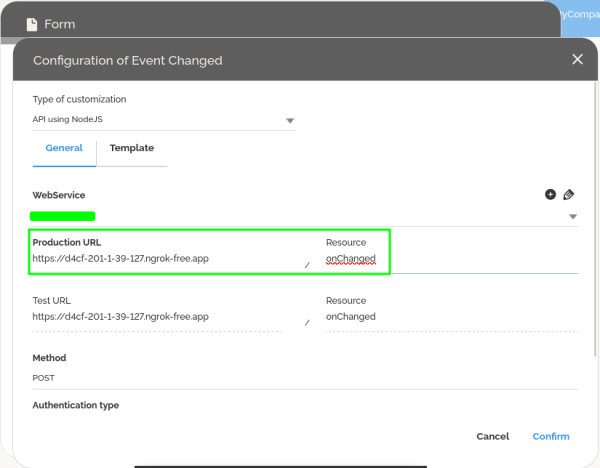
Note that different from before, we do not need to configure any sending and response parameters, all the information will be manipulated inside the application and sent to the HEFLO environment inside a context. - Confirm the configuration.
- Save the configuration.
- On the editor, right-click on the start element and select Test, then Start new work item.
- Validate the configuration.
An interesting point is that this small project can be further adapted to model complex business rules and be a starting point for future projects.
It is important to note that this approach uses a local project to simulate a company API that would normally be deployed and available online. As a result, this implementation will only function while the local project is running.
Once the solution has been validated, please coordinate with your IT team to deploy the project to an appropriate production environment. Alternatively, HEFLO offers consulting and implementation services to help organizations deploy and manage their business rules. For more information, please contact the sales team at: Link
Conclusion
To sum up, this article explains the integration approaches available in HEFLO and helps users identify the best option for each automation scenario.
Web services are typically used when no complex business logic is necessary and the focus is only the data transfer, meanwhile, HEFLO’s API customization allows access to all the features of a web service, but with access to built-in function that allows specific data operation, data manipulation and much more.
For both cases, simple examples of usage and configuration were presented, but be aware that we also have additional documentation related to information or use cases on our knowledge base and API documentation.