
Sending documents for electronic signature is now available on HEFLO thanks to integration with the third-party electronic signature tool: DocuSign. This integration allows you to create, send and receive your online documents securely when executing automated processes.
In this article, we will walk you through each step: from integrating the feature into your environment to tracking documents sent to sign.
Add DocuSign functionality to your environment
You must configure DocuSign integration into your environment. This will enable the feature and make it available for use in your processes.
To learn more about integrating DocuSign into your environment: Configure DocuSign integration.
After integrating your DocuSign account into your environment, the “Document Signature” connector will be available for message type tasks with throw and catch behavior and for message type events with catch behavior.
DocuSign terminologies on HEFLO:
In this part, we will introduce the terms that will be used when configuring processes using the DocuSign integration.
- Envelope: DocuSign uses an “envelope” as the container for all documents to be sent for signing. These documents will be compiled into a single envelope, this is the item that will be shared with the recipients.
- The statuses of the envelope: DocuSign uses several envelope statuses, and you will mainly encounter them when running instances: completed, voided and declined.
- Completed: This status means that the envelope documents have been signed by all recipients.
- Voided: This status means that the sender of the envelope canceled the signature before it was completed. The recipients can no longer view or sign the document. Voided documents will have a “VOID” watermark.
- Declined: The envelope is “declined” when one of the recipients refuses to sign the documents.
You will encounter other statuses in the work items dialog box:
- Expired: An unsigned document that has exceeded the set expiration time is expired. This deadline is defined in the verbal procedure signature. Expired envelopes are considered void.
- Draft: The envelope is created but has not yet been sent to the recipients.
- Sent: The envelope has been sent to the recipients but none of them have viewed it yet.
- Delivered: All recipients have viewed the envelope documents.
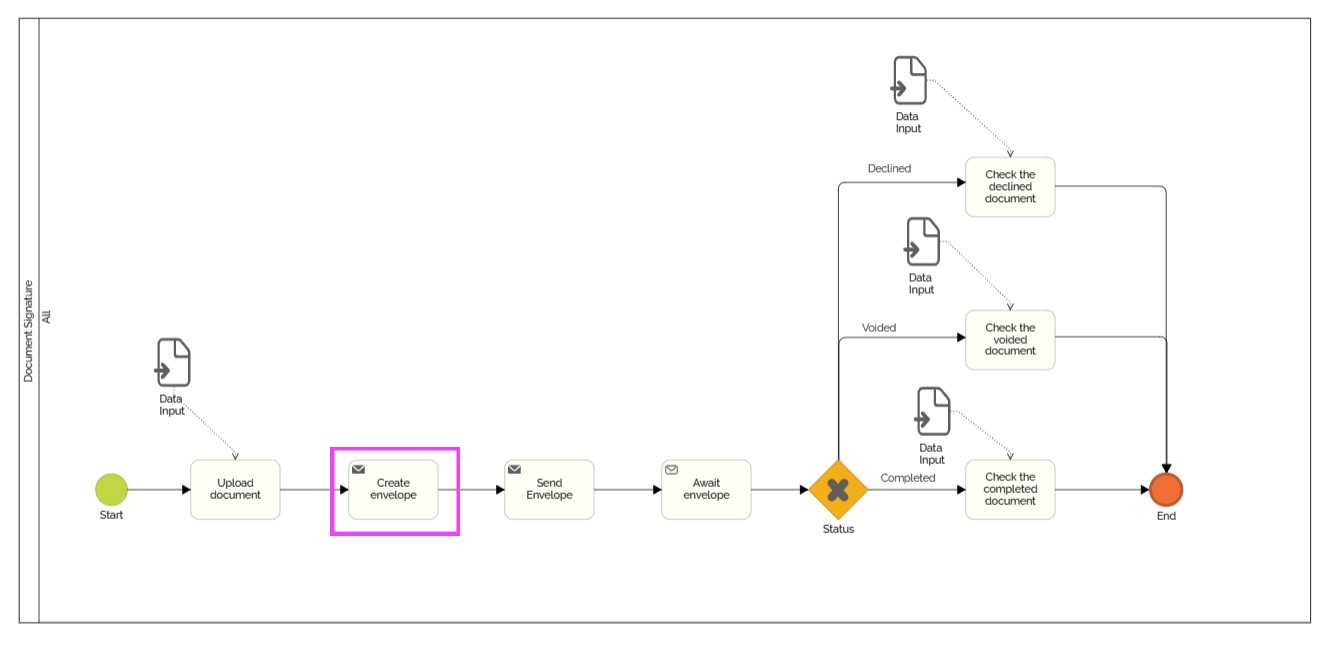
- The steps for sending the envelope to sign
The electronic signature process includes 3 steps:
- Create the envelope: The objective is to create the envelope containing the documents to be signed, to define the recipients and to personalize the message they will receive.
- Send envelope: The objective is to send the previously created envelope to the desired recipients.
- Receive the envelope: The objective is to block the execution of the work item while waiting for the envelope to be completed, voided or declined.
Using DocuSign on HEFLO
In this part of the article, you will learn how each step will be used on HEFLO to run process instances.
You can access other articles that use example processes to illustrate the use of DocuSign in HEFLO:
- Send a DocuSign document template to sign.
- Send a document to sign on DocuSign.
- Send a report generated in HEFLO to sign on DocuSign.
- Add a verification step before sending documents to be signed on DocuSign.
- Create the envelope
When the process instance reaches the “Create Envelope” step, HEFLO then creates a draft envelope containing the documents to be signed, either from an existing template in the DocuSign account associated with the environment, or from an uploaded document. This envelope is stored in the “Drafts” folder of the DocuSign account used with this configuration.
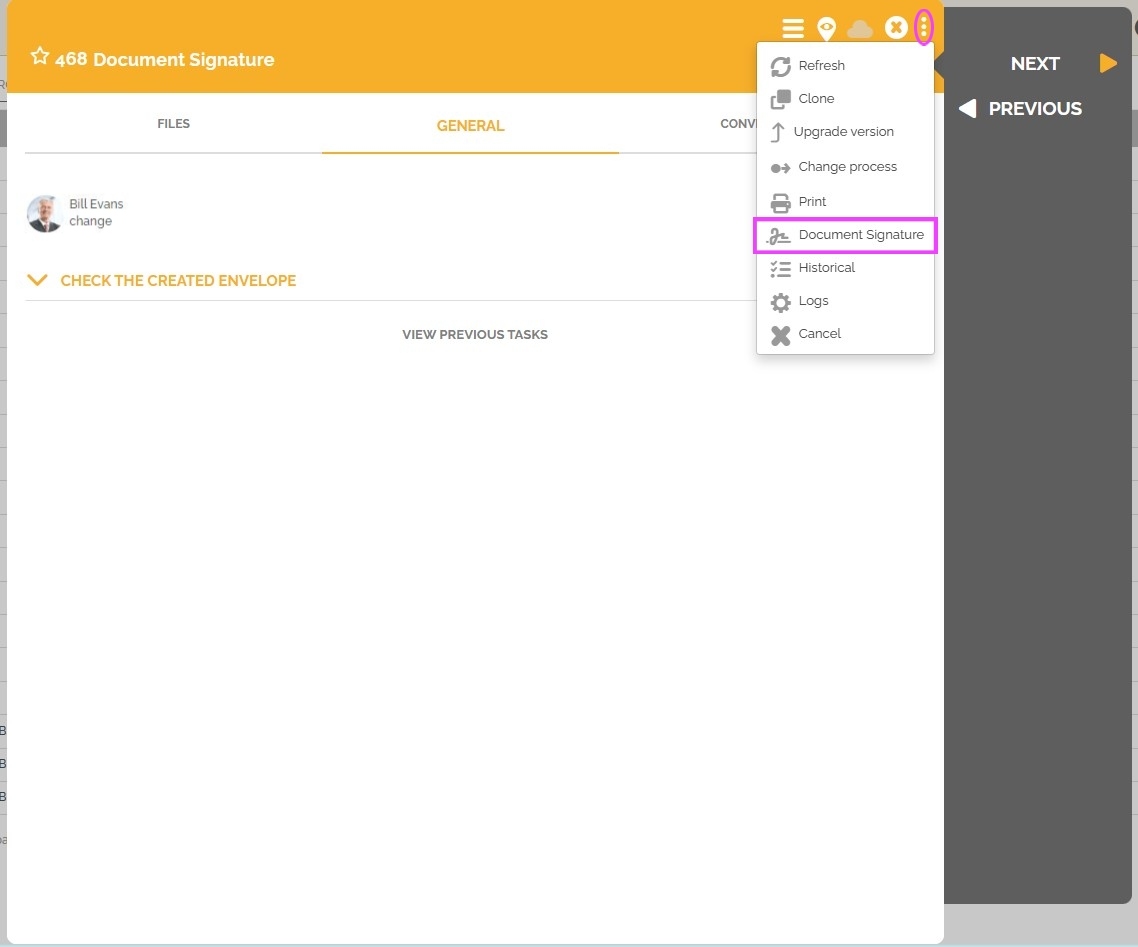
You can view the created envelope by opening the document signature report from the vertical ellipsis in the work items dialog box.
You can also preview the envelope. This will open the documents created in sequence for you in another tab.
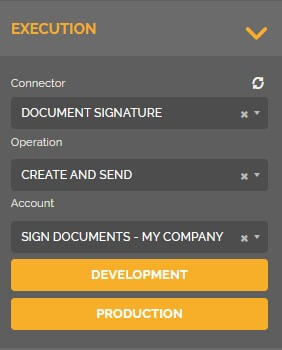
Once the task is configured with the “Document Signature” connector, the “Create” operation and associated with the DocuSign account, you must then configure the envelope that will be created.
The configuration of this step must be done by clicking on the “Development” or “Production” button.
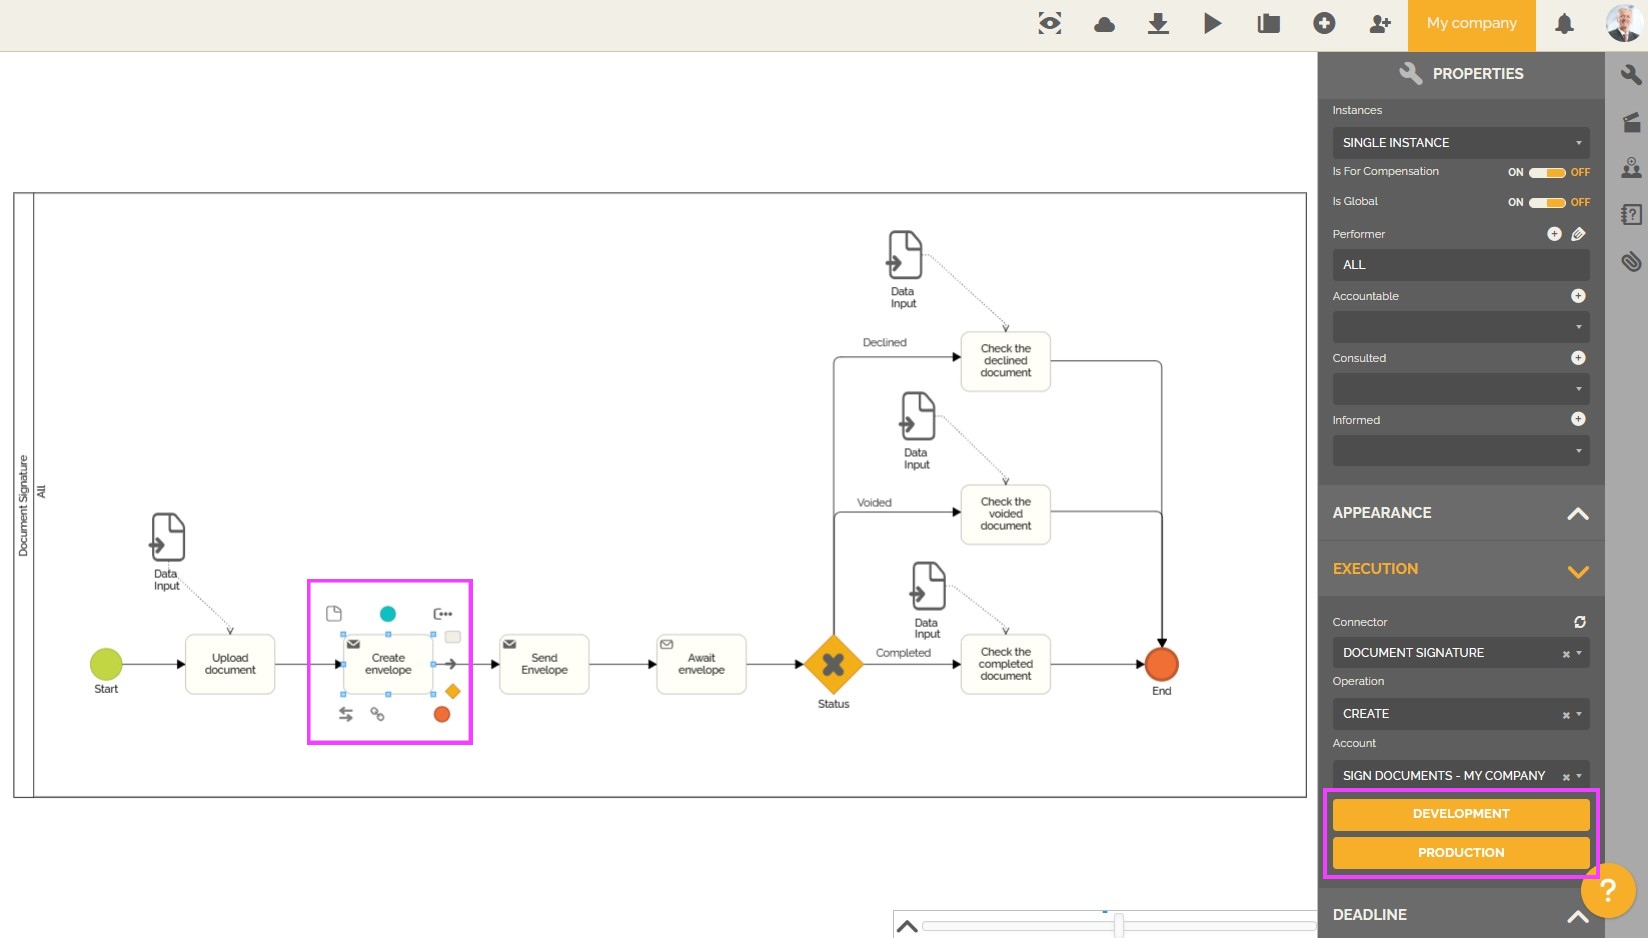
- The “Development” button allows you to configure the creation and sending of the envelope for test work items. The “Development” button is linked to the DocuSign developer account associated with this environment.
- The “Production” button allows you to configure the creation and sending of the envelope for production work items once the process automation is published. The “Production” button is linked to the DocuSign account associated with this environment.
To learn more about the difference between a DocuSign account and a DocuSign developer account: Configure DocuSign integration.
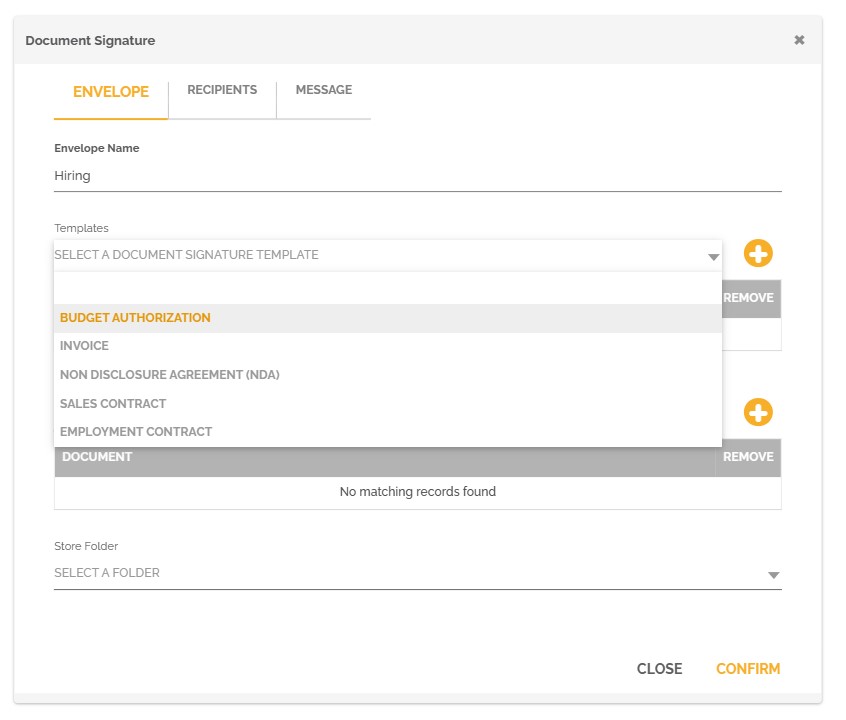
When you click on the development or production button, you access the configuration screens of the envelope itself. You must then define the contents of the envelope, the recipients who will receive it and the message that will accompany the sending.
- Envelope parameters
You must select the document types sent with this process.
- You can use templates from your DocuSign account to send them for signing. To learn more about sending DocuSign templates: Send a DocuSign document template to sign .
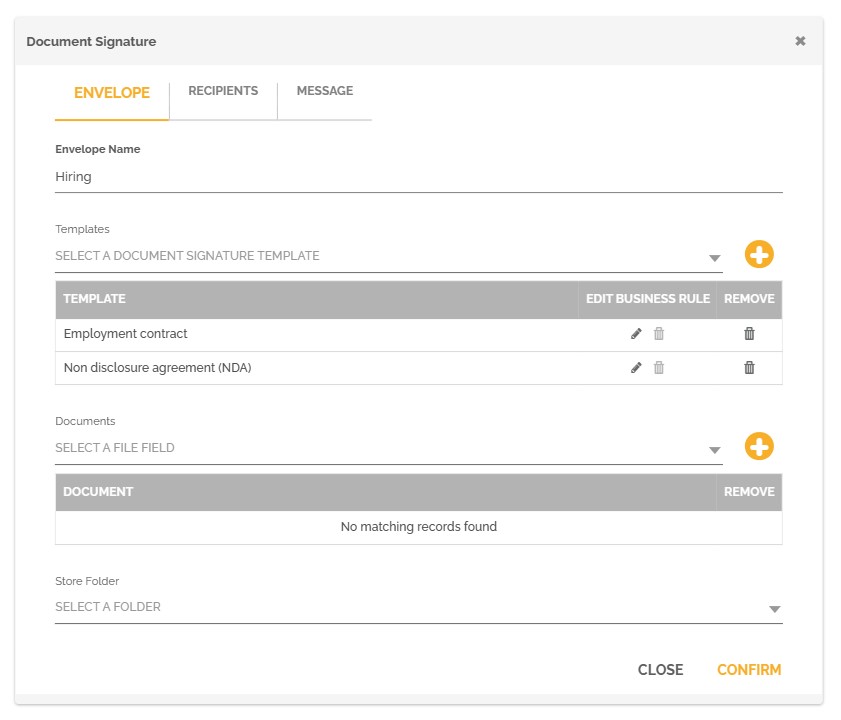
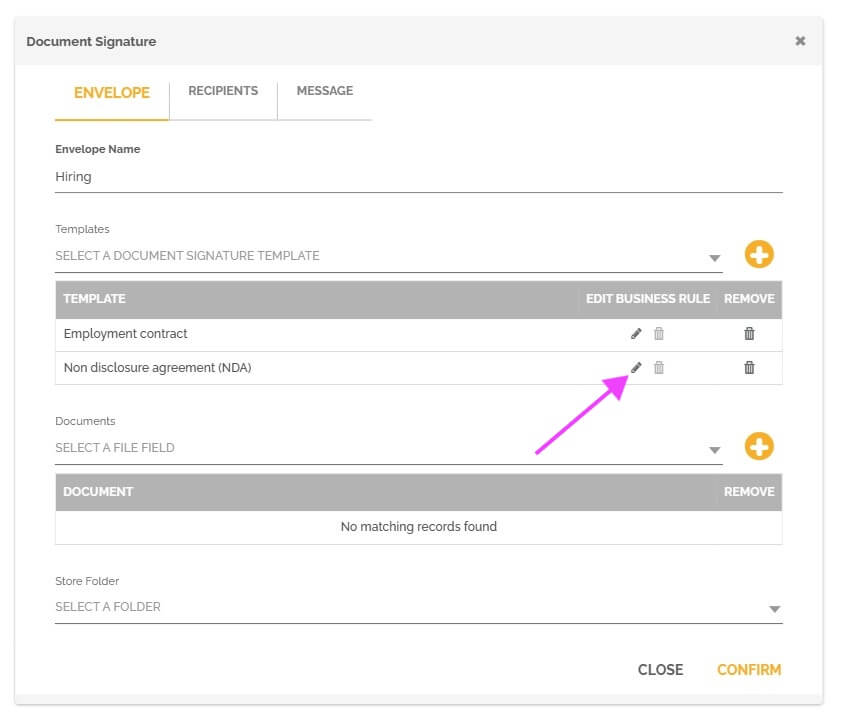
It is also possible to control which templates will be used in the executed instance of the process based on predefined information and verified using business rules by clicking on the pencil icon in the templates section.
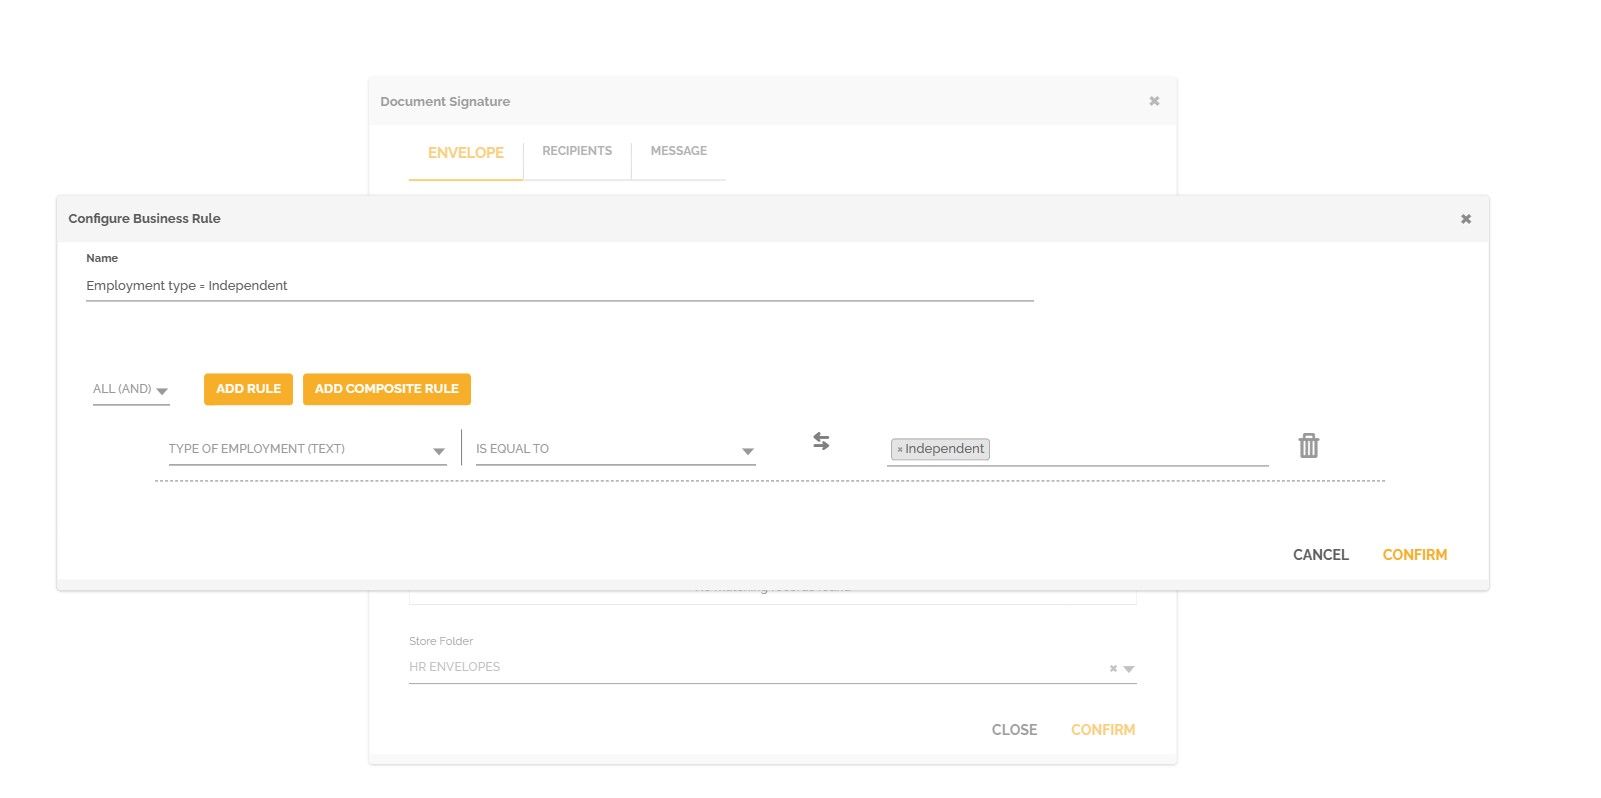
- You can use uploaded documents to create your envelopes. To learn more about sending documents for signing on DocuSign: Send a document to sign on DocuSign.
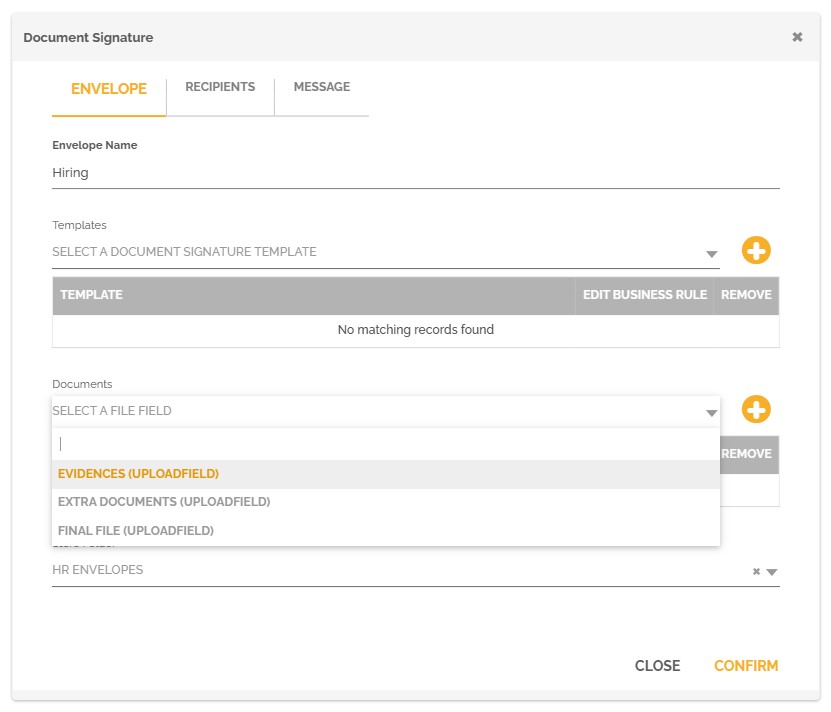
You can also use “anchors” by adding them to your documents. To learn more about anchors and how to use them: Customize a document by adding actions to perform on DocuSign. - Model and document selection is also possible. You need to make sure to add a template to your configuration, as well as the field that will contain the document to upload.
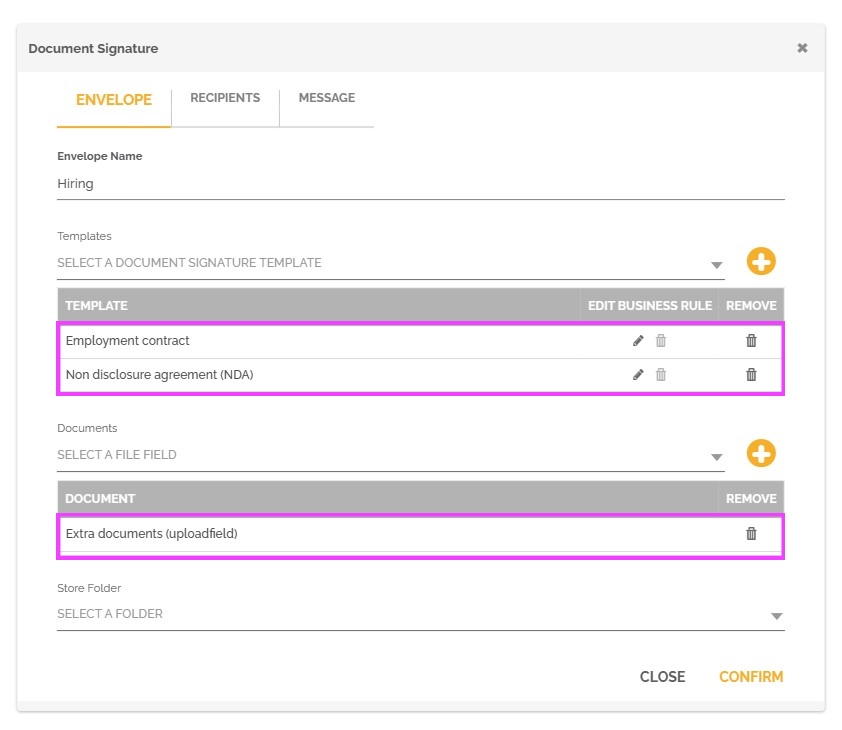
Please note that at least one of the two options is mandatory. You must select at least one template or one “Files Upload” field to upload the document to be signed. You cannot create an empty envelope.
- You can use templates from your DocuSign account to send them for signing. To learn more about sending DocuSign templates: Send a DocuSign document template to sign .
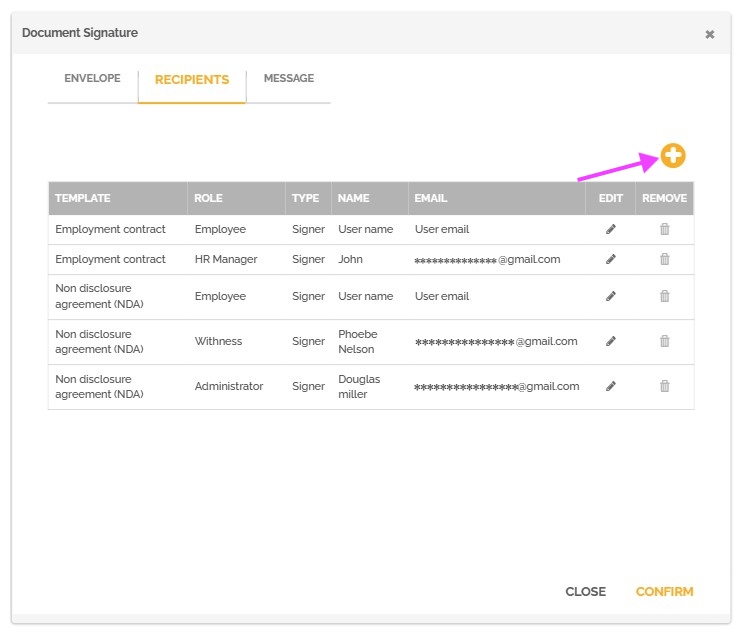
- Recipients settings
You must specify who will receive the envelope. There are two types of recipients:
- Recipients of the document template in your DocuSign account.
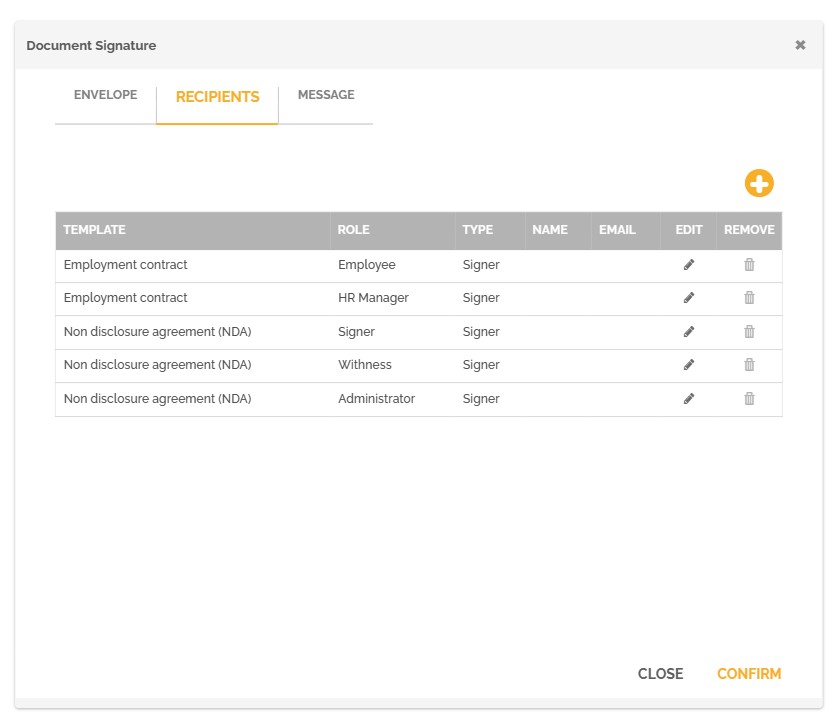
- Recipients of the document template in your DocuSign account.
In this tab you will find all the recipients of the templates used.
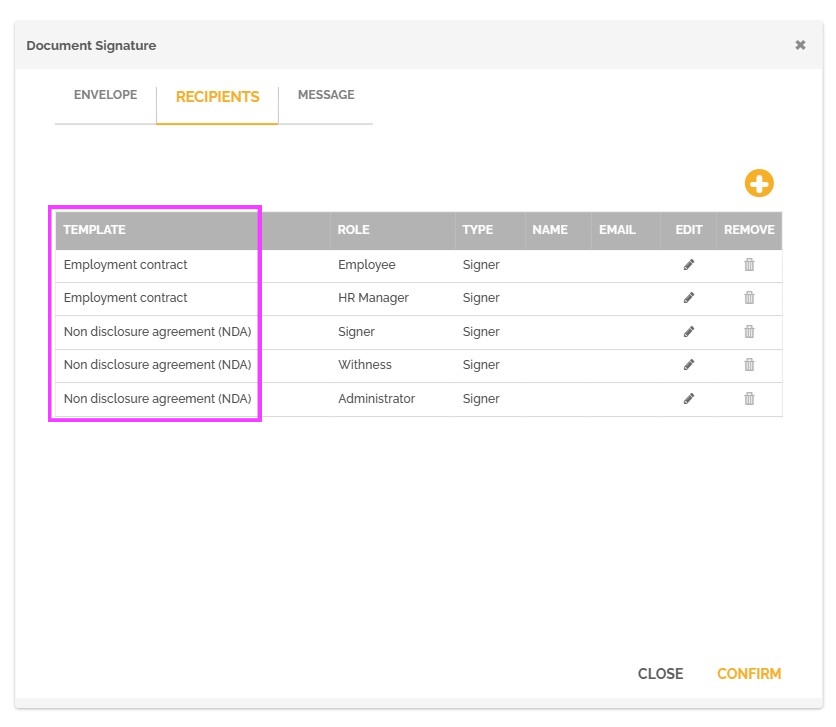
These recipients already have their role and their type of signatory indicated. This information comes from the DocuSign template.
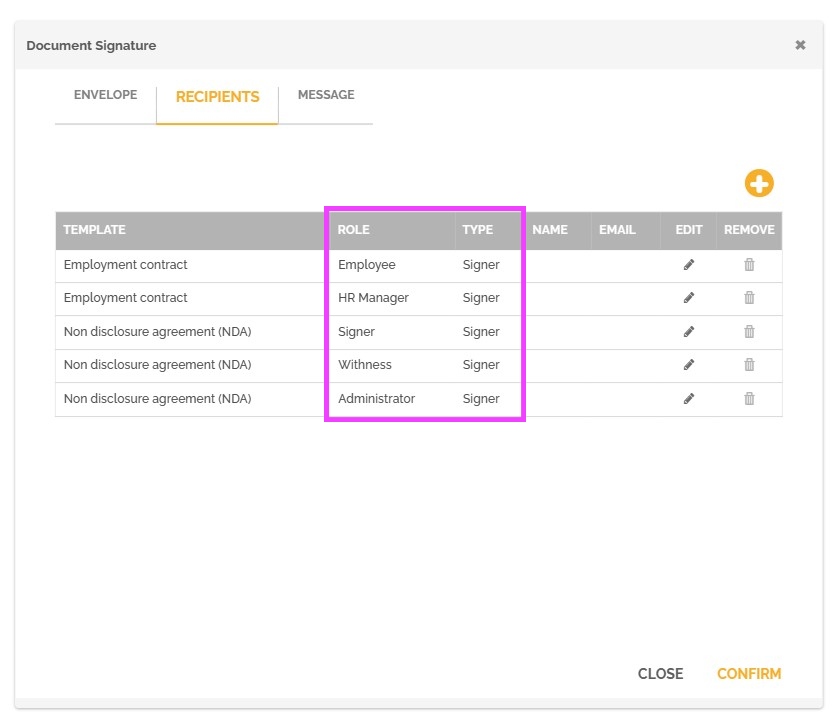
The types of signatories available on HEFLO are: Signer (Needs to sign), Witness, Carbon Copies (Receives a copy), Certified Deliveries (Needs to view) and Agents (Specify recipients).
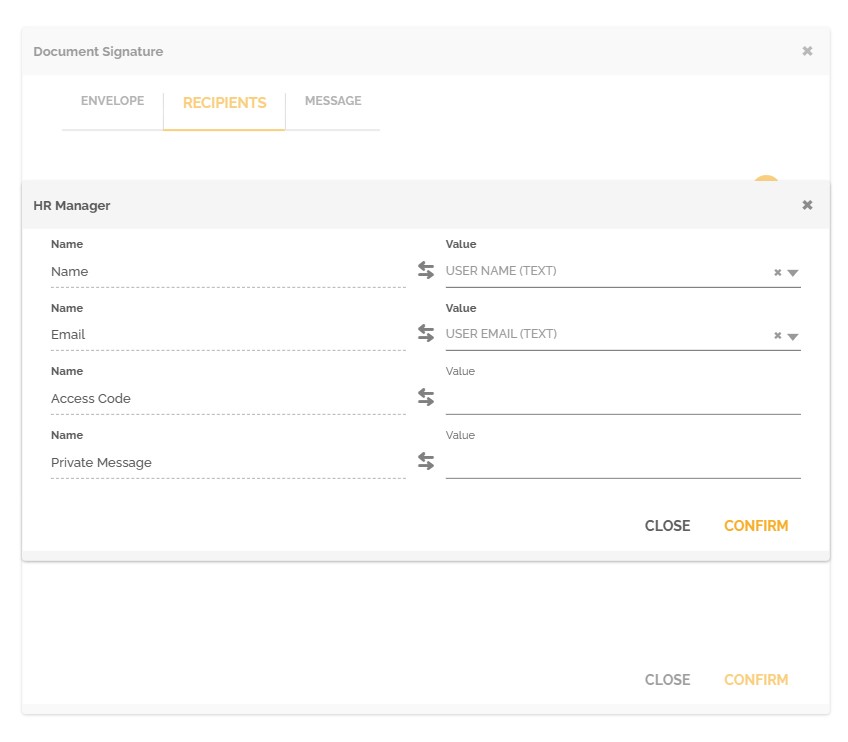
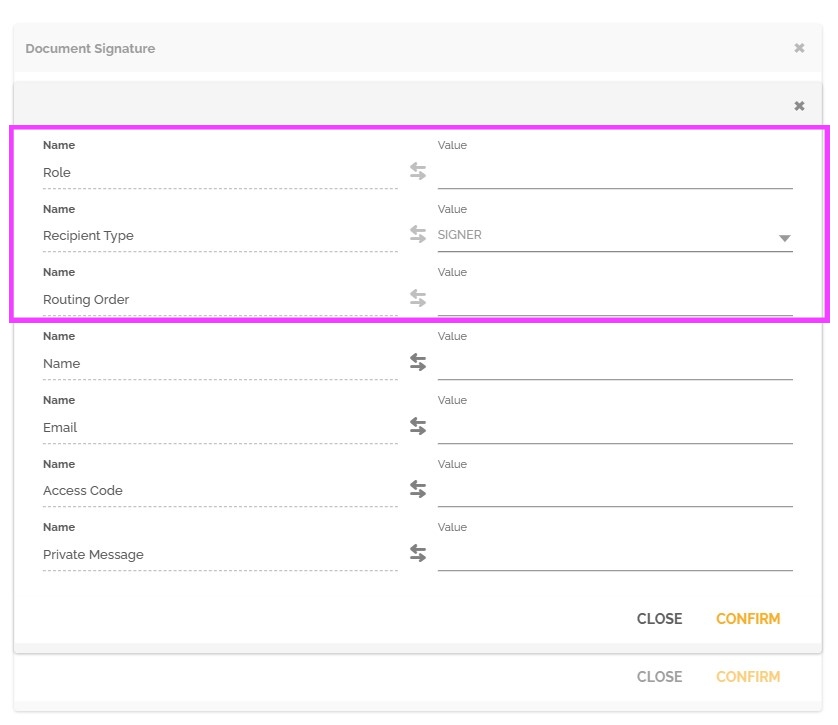
You must fill in the information regarding the name and email of this recipient, either by using predefined text
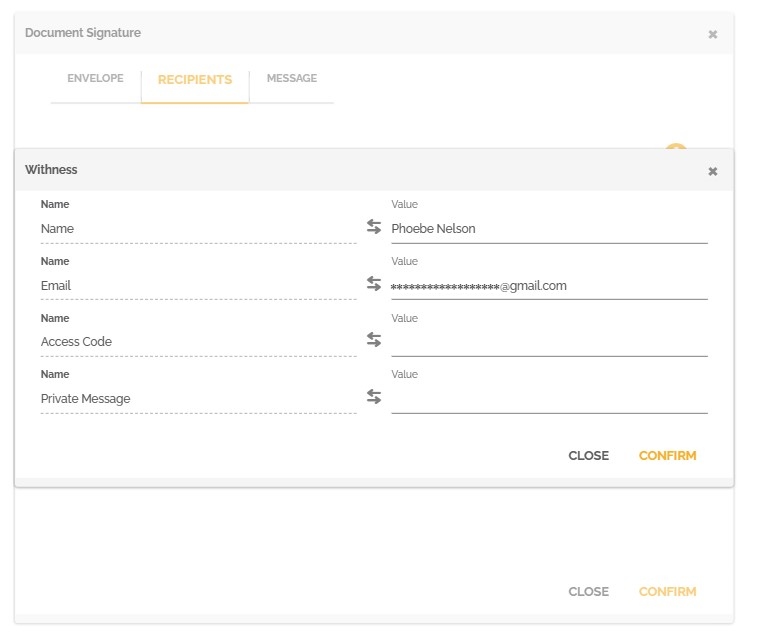
or by selecting a field associated with a form of a task in the process which will contain this information.
- Personalized recipients.
You can create recipients by clicking the “+” button.
There are additional fields to complete in the “New recipient window”.
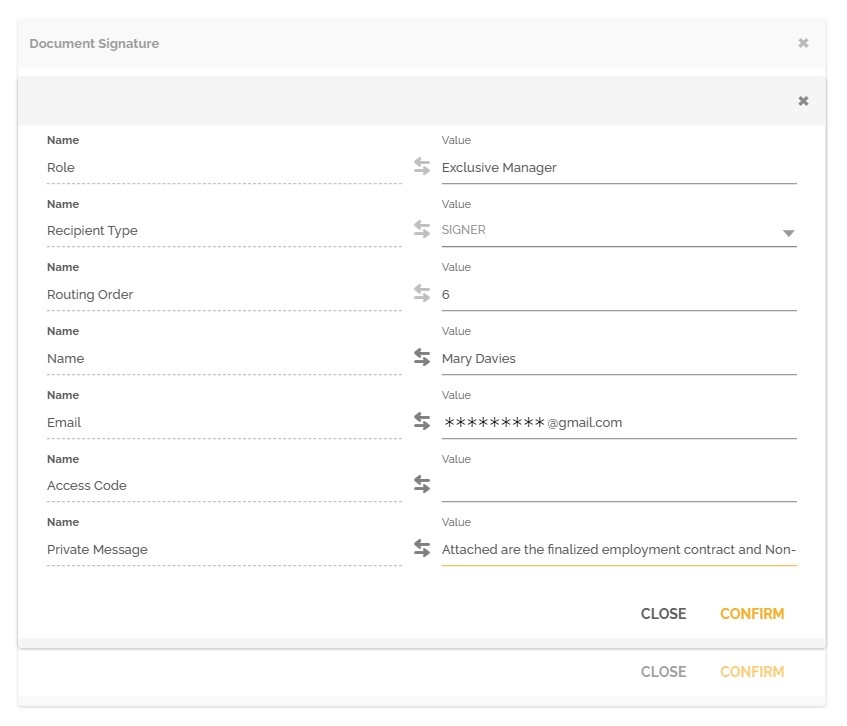
When you confirm its creation, it is automatically added to the list of recipients.
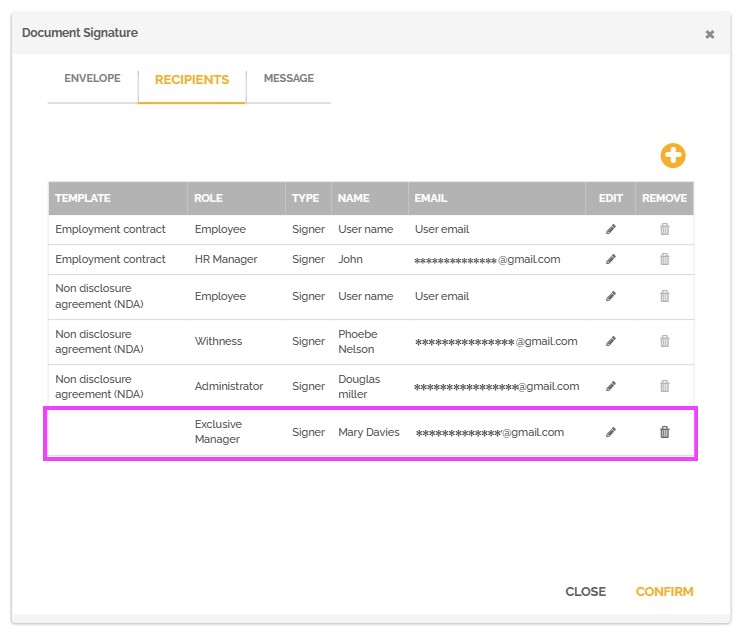
Your recipient list may contain a mix of recipients from the selected template and custom recipients.
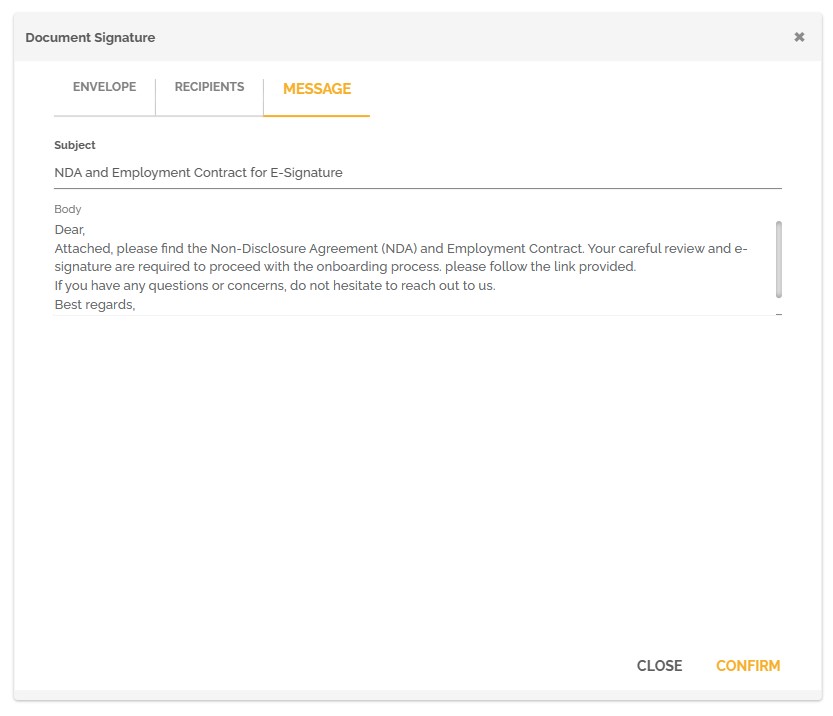
- The “Message” tab
You must personalize the message that will be sent to the recipient(s) email box. For information: only the subject is a required field.
Once the configuration of these 3 tabs is done, you can then click on confirm to finalize the configuration of the envelope creation task.
Each time you add a task with the “Document Signature” connector and the “Create” operation to your process and run an instance, it creates another envelope tab in the “Signature Report” window.

- Send envelope
When the work item reaches the “Send Envelope” step, HEFLO then transfers the created envelope from the drafts folder of the DocuSign account to the recipients defined in the previous step (the create step). The instance automatically moves to the next activity in the process.
The configuration of this step consists of defining which created envelope should be sent by this task. You can only select one by clicking on the chain icon then selecting the relevant task which is configured with the “Document signature” connector and the “Create” operation.

![]()
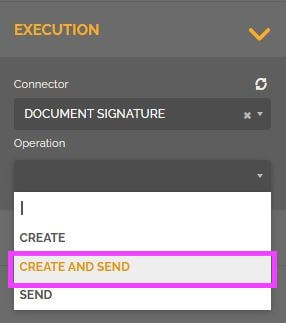
For information :The “create” and “send” steps can only be performed using the send message tasks. Both steps can be executed together in a single task with the operation “Create and Send.” This operation combines both the functionality and configuration of the “create” and “send” operations. With this operation, the link with the creation task is not necessary, because this task will instantly create the envelope and then send it to the recipients configured in this task.
You can add an envelope verification step by using a create envelope task and one to send the envelope. To find out more: Add a verification step before sending a document for signing on DocuSign.
- Receiving the envelope
In the third step, the work item will wait to receive information about the sent envelope. The instance can then retrieve important information such as “envelope status” and the updated document.
This step can be accomplished with a message type event or task with catch behavior.
Please note that if you have created multiple envelopes, then you need more than one send task and more than one awaiting element in your process to receive the envelope. There is a send task and an envelope receive element required for each envelope creation task.
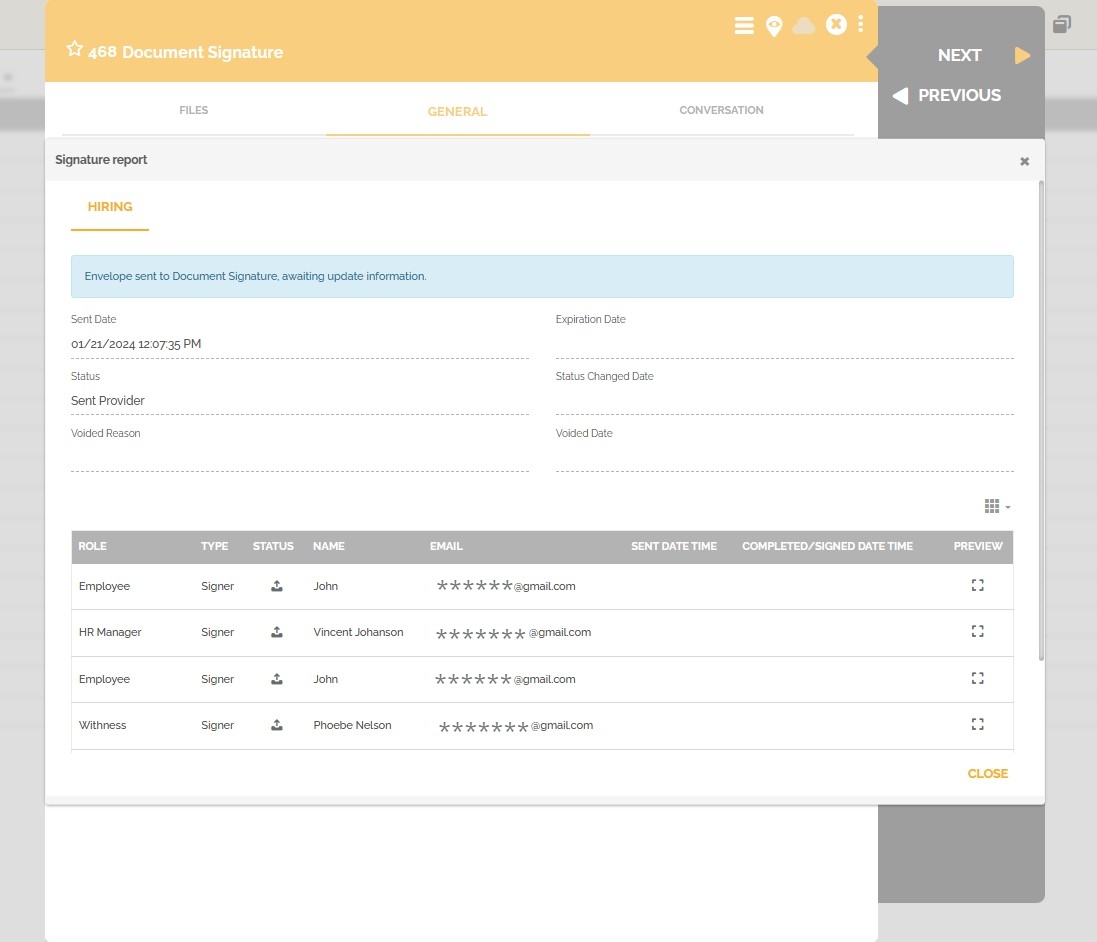
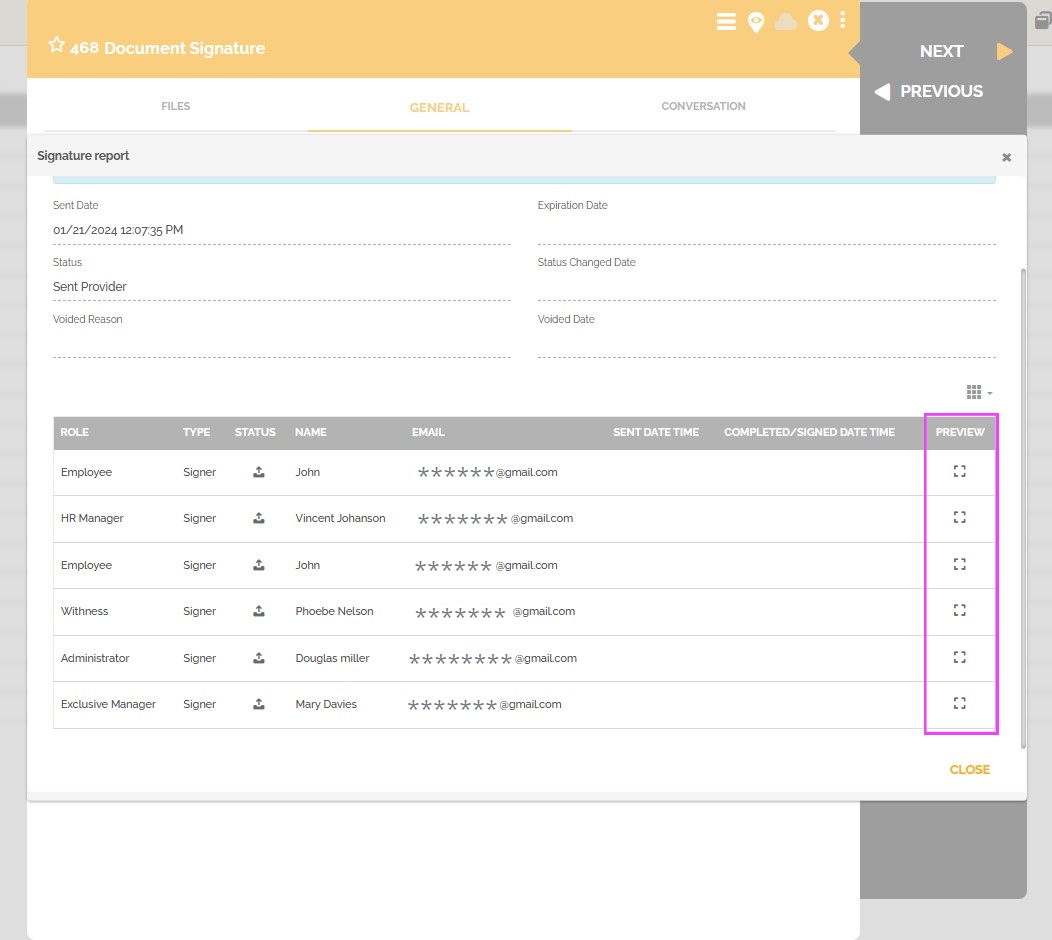
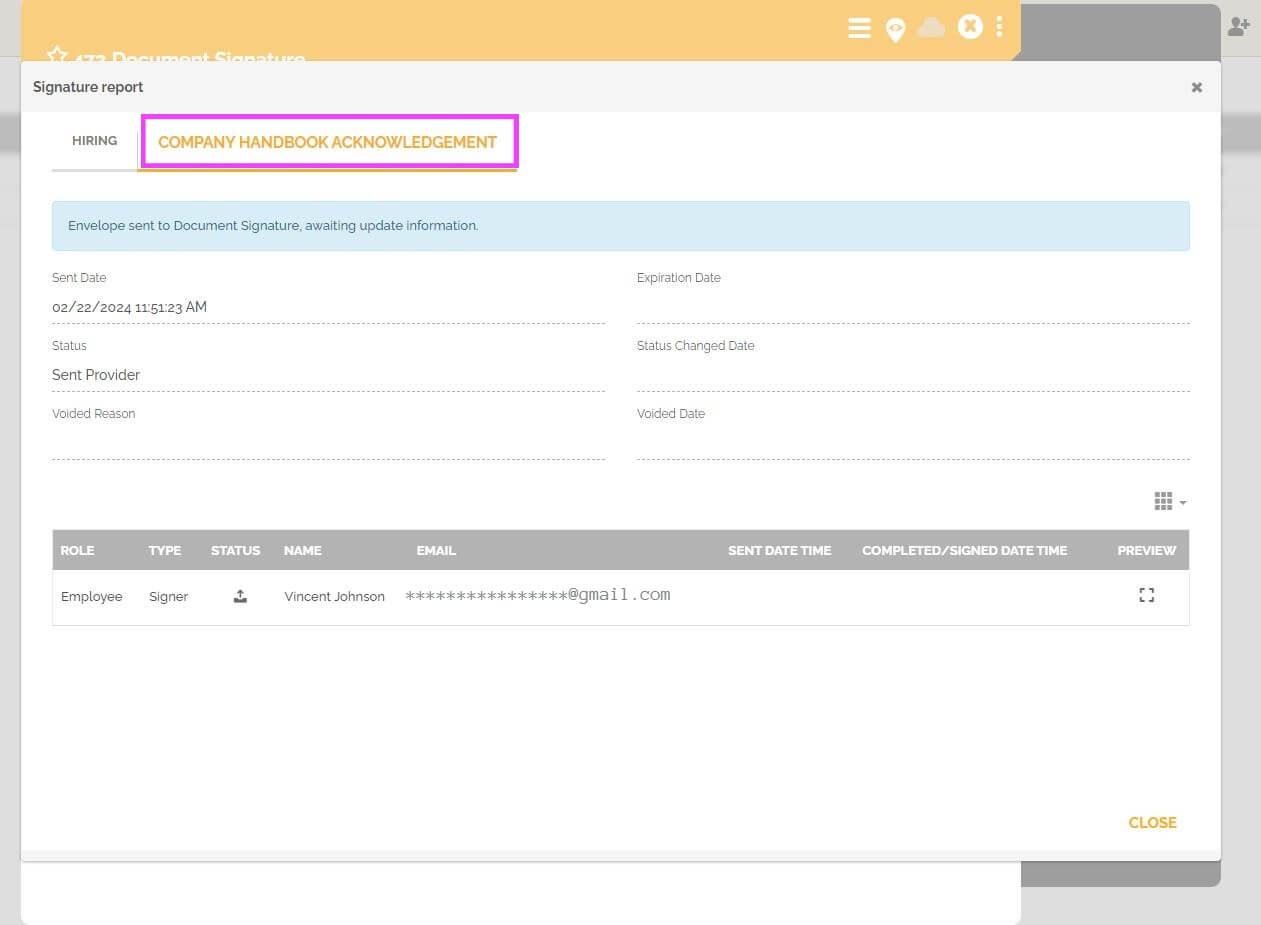
In this step of the process, you can still track the status of your sent envelope. Click the “View details” button to access the signature report.
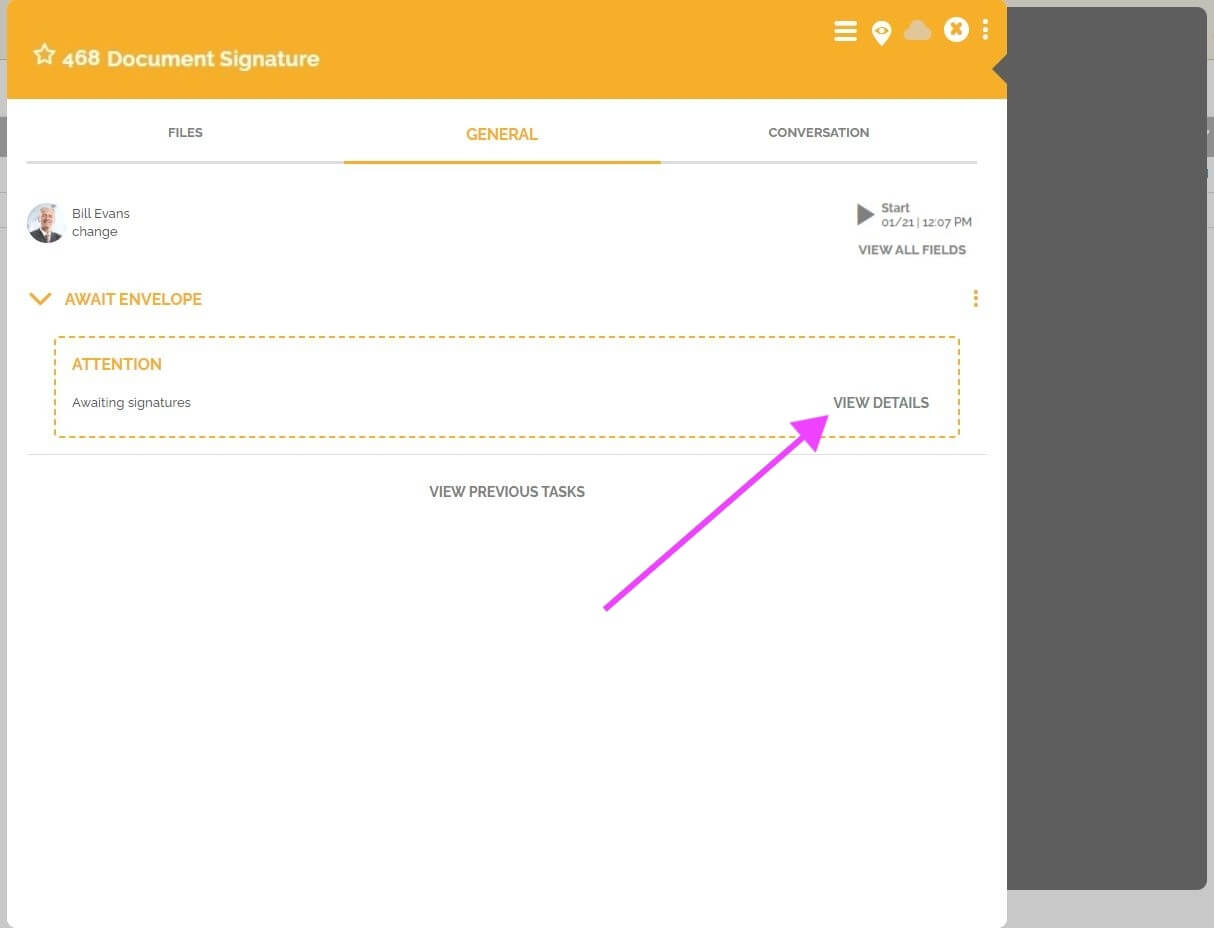

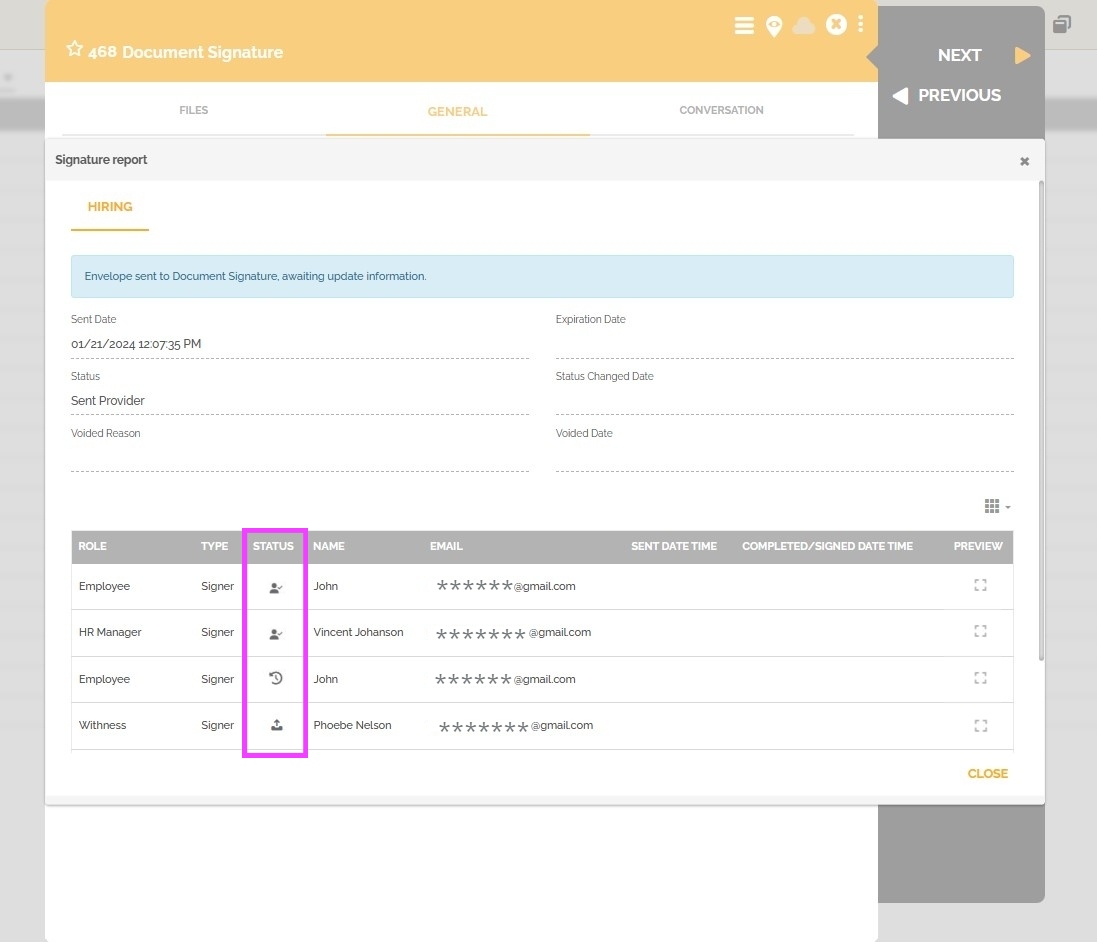
As seen previously, this window gives you information on the sending date, the expiration date, the status of the envelope and if for example it is voided, you will then find the reason provided. There is also a table that gives detailed information on the envelope status for each recipient.
When the envelope is completed by all recipients and the instance is in the waiting task, it will automatically advance and receive in a field of one of the forms the status of the envelope and the updated document(s).
To be able to retrieve this information, you must first add fields that will receive it in a form associated with one or more tasks that are after receipt of the envelope.
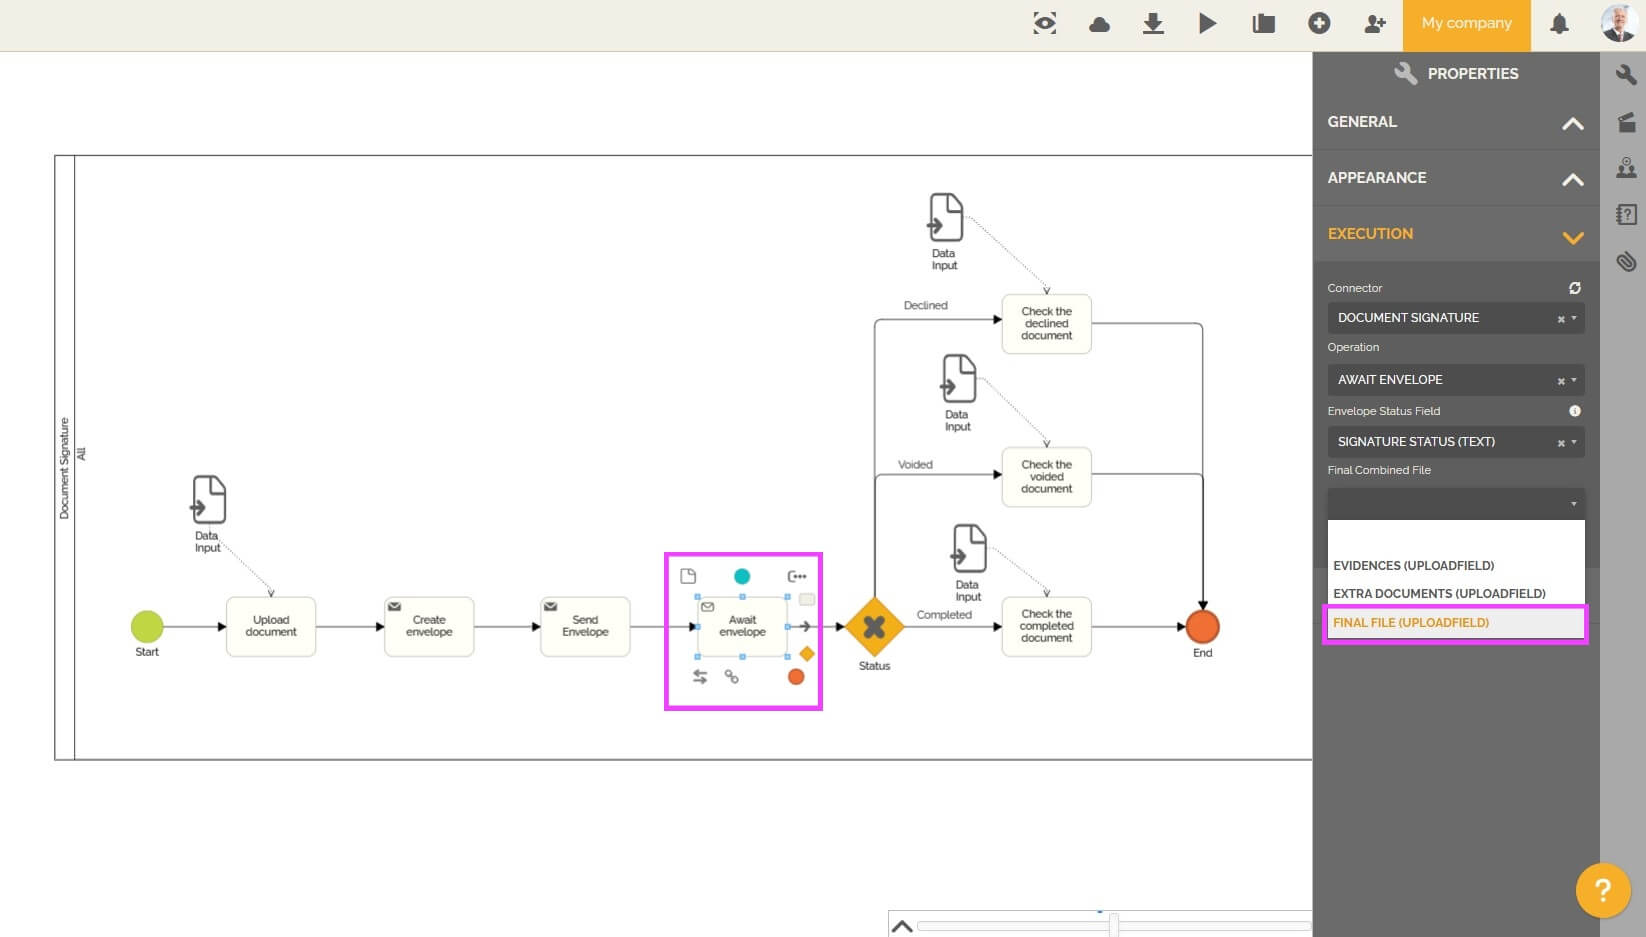
You must configure this receive task or event to be able to obtain this information and associate it with fields in your environment.
- Select the relevant task or event.
- Go to the properties and choose the connector: “Document signature”.
- Choose the “Await envelope” operation.
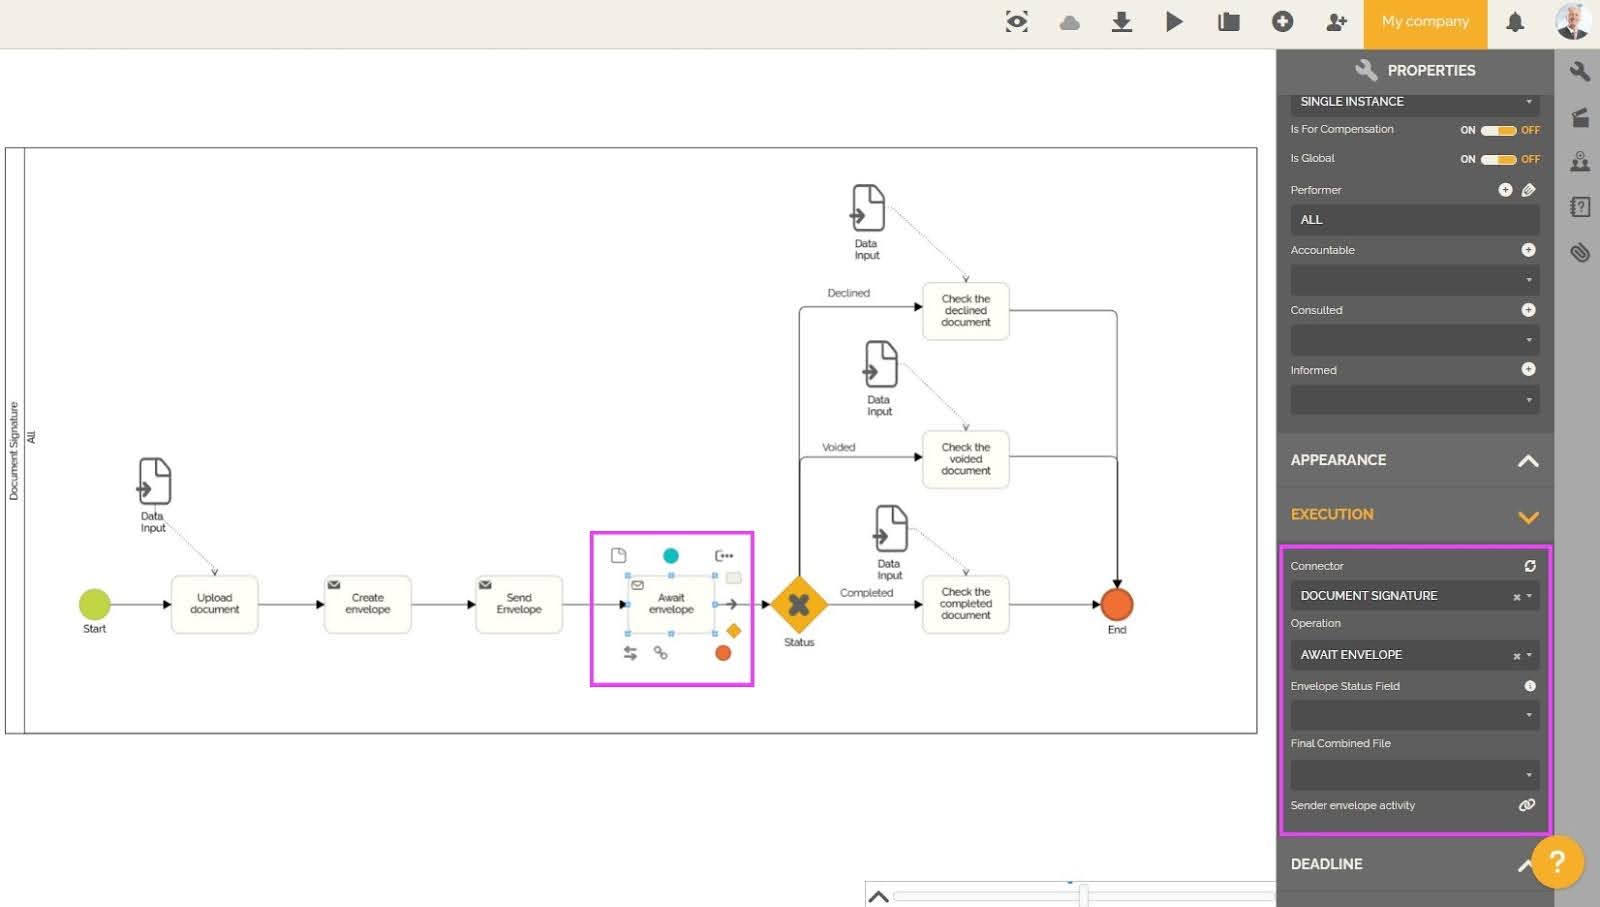
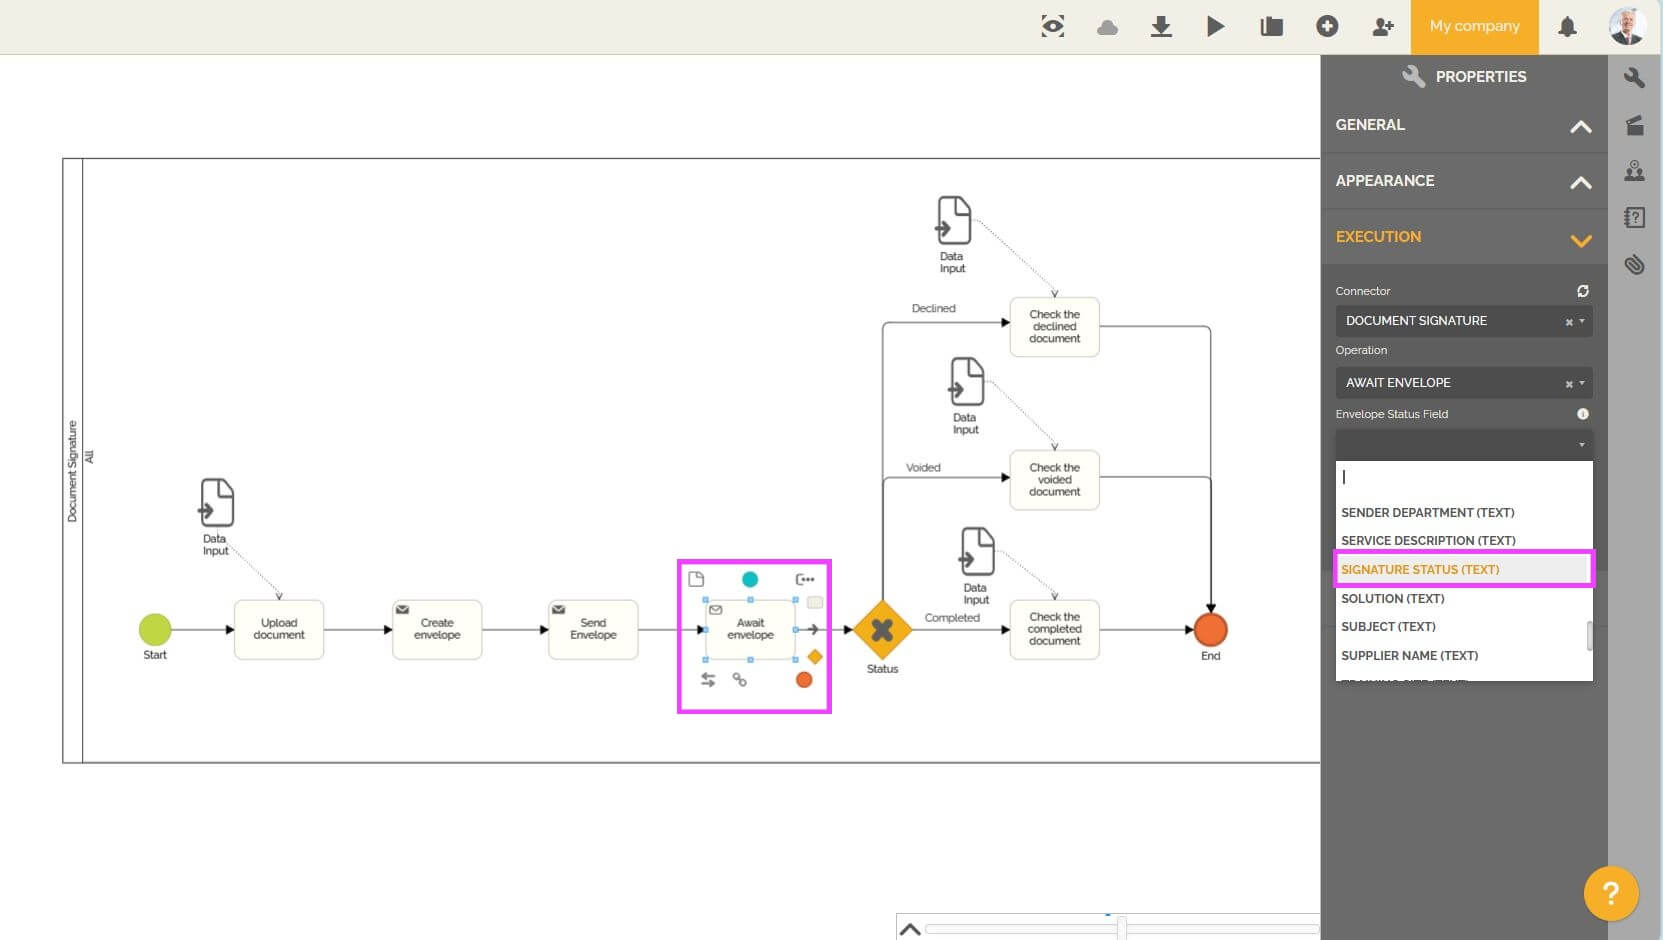
- In the “Envelope Status Field” section, choose the HEFLO field that will retrieve information regarding the status of the envelope in DocuSign. This field must be of “Text” type. When the envelope sent has received action from all the recipients (in the case where the document(s) contained in the envelope have been signed), or one of the recipients (in the case where they have been declined), then this selected field will receive the final status of the envelope. There are three statuses: completed, voided and declined.
If you click on the “i” icon, a window will open. You will then find the definition of the different statuses of the envelopes as seen in point 2 of the section on DocuSign terminologies on HEFLO.
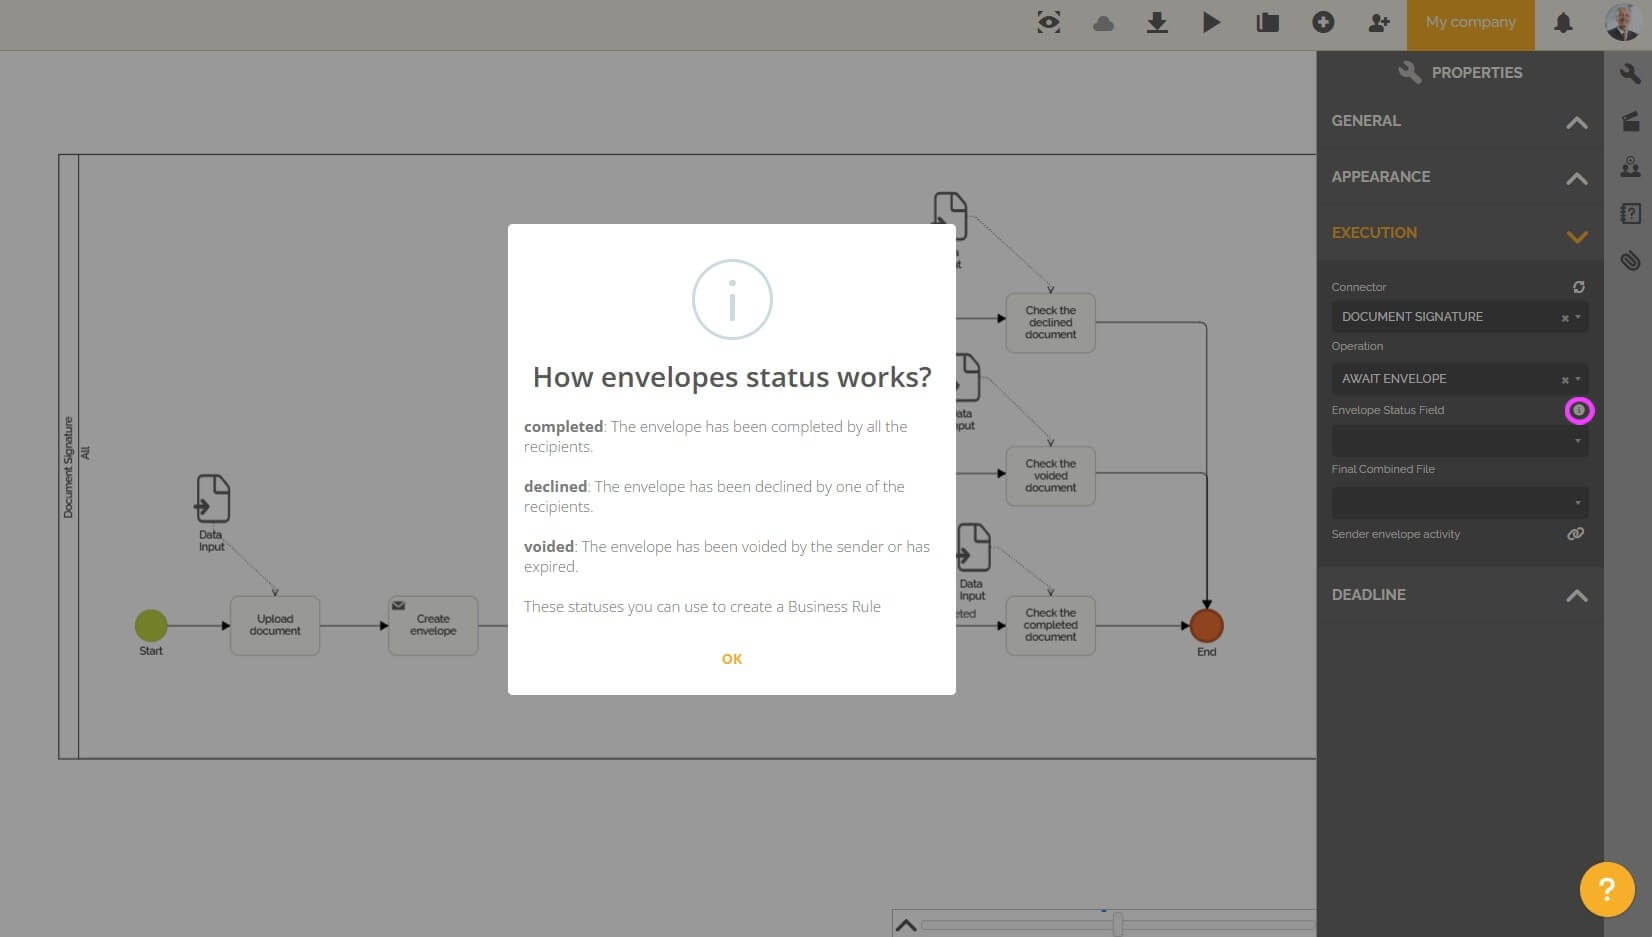
You can also create a business rule for each output flow using the field chosen in the “Envelope Status Field” section. For information: whatever language you use in HEFLO, the DocuSign statuses are in English: “completed”, “voided” and “declined”.
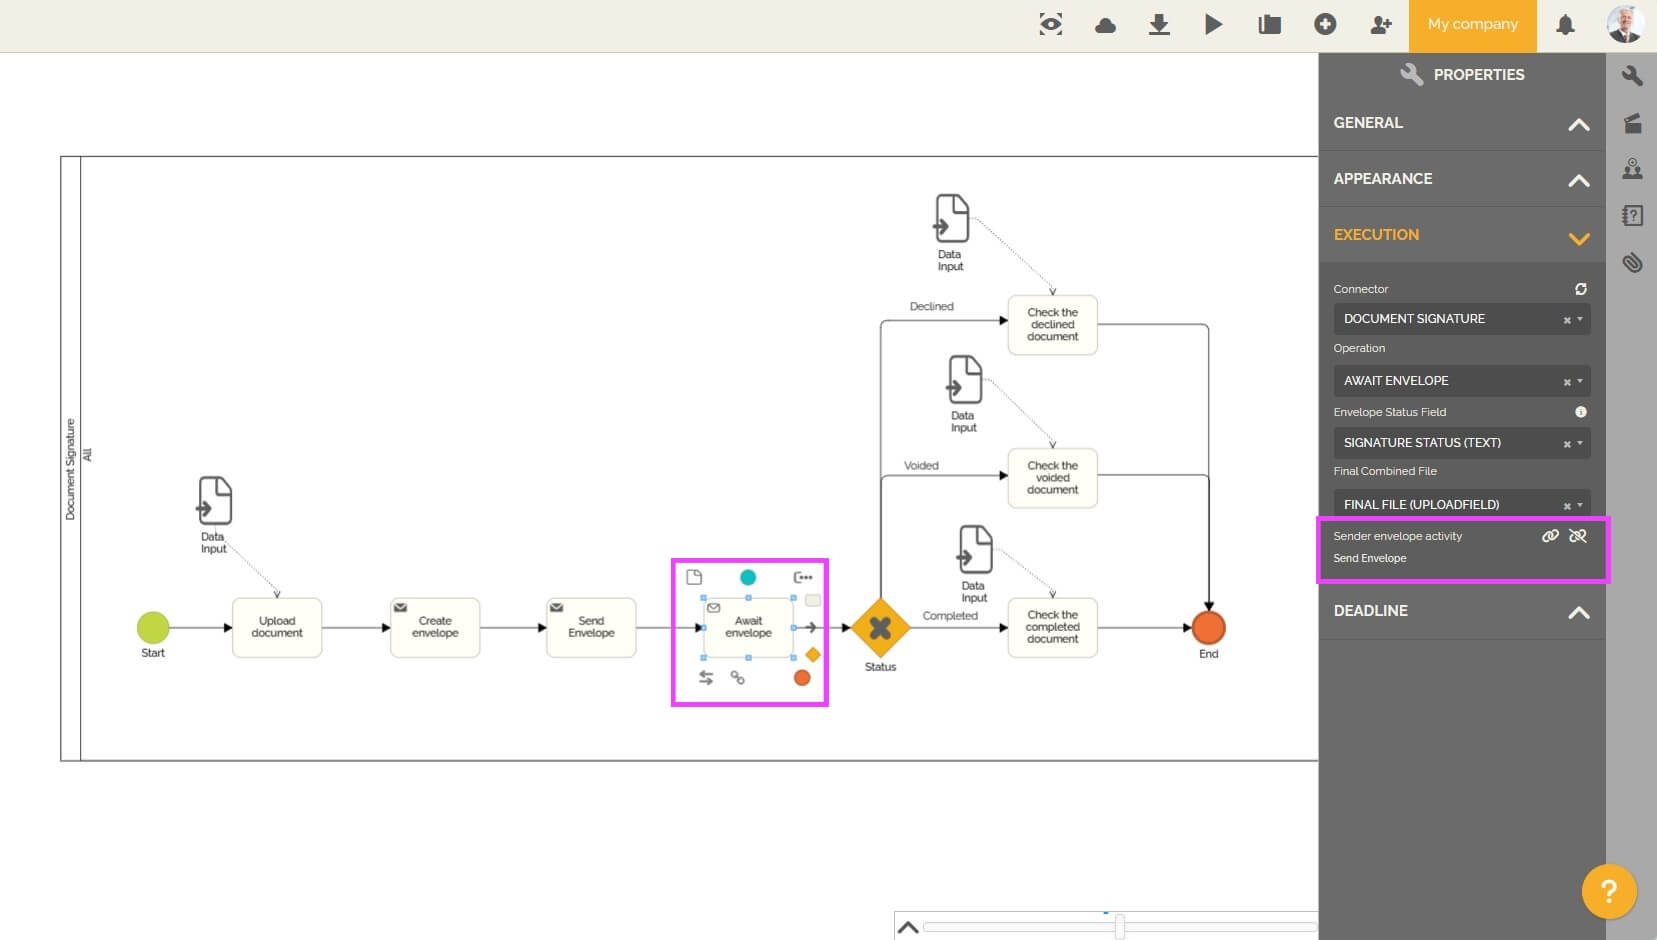
- In the “Final Combined File” section, choose the HEFLO field that will retrieve the final document contained in DocuSign. This field must be of “Files Upload” type.
- Then click on the chain icon and select the task of sending the envelope, so that the system knows which envelope this task is associated with. After selecting the sending task, you can then find this information under the chain icon. We advise you to name these tasks well so that you can differentiate them in case you have several envelope sending tasks.
Other possible uses of the electronic signature on HEFLO
You can attach a report to a field in the process instance and also send it for signature. To learn more about sending signature reports : Send a report generated in HEFLO to sign on DocuSign.
You can track the status of created envelopes using widgets. To find out more : Monitorize pending envelopes.
You can check out the recording of our webinar on Docusign integration: Webinar: Docusign integration.