
HEFLO gives you the ability to generate reports and display them in a workspace page using a widget, or send them during the execution of a process.
In this article, we will show how to access the report editor and create a report with work item information for a particular process. We will then add this report as an email template attachment.
We will use this process to demonstrate this feature.
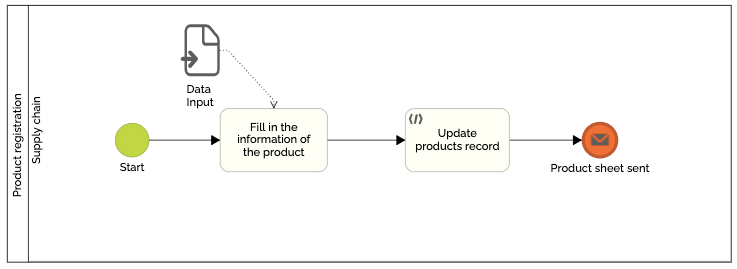
And we will use these fields to fill in the product record.
The objective is to add a product to the record of products associated with this environment. Once the information has been recorded, and the product has been added to the record, the process sends an email with a document attached containing the information for the product concerned.
We will show the different steps to create the document that will be sent as an attachment.
Enable database replication for your environment
To retrieve information from a work item in a process, we will need to create a query in the process editor using information from the database associated with your environment.
If you have already enabled this feature in your environment, then you can skip this part.
To enable database replication for your environment, follow these steps:
- Go to the Process Editor.
- Click on the icon of “Visualization mode”.
- Click “Data Export”.
- Click “Activate this feature now!”.
- Wait for database replication to complete.
Once database replication is complete, you can access the database structure, view the data, and export it. To know more: Tutorial: Data export.
Create a report
To access the report editor and create a report, follow these steps:
- Go to the Process Editor.
- Click the “Visualization Mode” icon.
- Click “Reports”.
- Click the “+” button.
- Give the report a name and click the “Open report editor” button.
You are redirected to the report editor.
You can use the different elements on the left to add fixed information to your report or to format it. You must drag and drop these elements onto the editing area which is located in the central part of the editor.
Warning: The editing area is divided into three parts: the top margin, the central part of the report and the bottom margin. You can increase the size of these different parts, and add new parts if necessary.
In our example, we will add a title to this report and a table that will contain the work item information.
Link the report to process information
To retrieve data for a particular process, you must link the report to the process view contained in your environment’s database replication.
To learn more about database replication views and how to view them: Tutorial: Data export.
Get process view name
First of all, you need to get the name of the view of the process concerned. Follow these steps to get this information:
- Open the process in the Process Editor.
- Go to the “Actions” tab and click the “View Schema” button.
- Research the process.
For information: You can access this screen using the “Data export” functionality seen previously. To learn more about data export: Tutorial: Data export. - You will then have access to two views. If you want to use information related to work items, then copy the name of the view containing the “wi” information. If you wish to use the information from the sub-tokens, for example in the case of sub-tokens created by a parallel gateway, then copy the name of the view containing the “tk” information. You can click on “+” to see the different properties of the view.For information: You can also create a consultation query to select fields or properties of the desired process. You can also use this type of query to join multiple processes.
- Return to the Process Editor and click “Compile view” to update the database.
Now go back to the report editor and open the previously created report.
Create a query to retrieve view data
Once the name of the process view is retrieved, we will be able to create a query to link the report to the work item information for this process. Follow these steps to make this configuration:
- Click the database icon.
- Click on this icon
 , then click on “Replica database” . The report editor then retrieves the database replication information.
 - Click on “Replica_database1”, then click on this icon
 .
. - Give the query a name.
- Write the query in the “SQL String” part to retrieve the information from the concerned process view. This query is of type “select”. It should be written like this:
select * from “process view name”
It is therefore in the “process view name” part that you must paste the previously copied view name.
For information: If your process contains special characters, put the “process view name” in: “, like this:`process view name`. - Click “Finish”. An arrow icon will then appear to the left of “Replica_database1”.
- Click this arrow icon, then click the arrow icon to the left of your query name. The list of different properties, columns, of your process view is then displayed.
For better user experience we suggest you use dark mode.
Put view properties in report
You can now drag information corresponding to fields or process properties into the report. Follow these steps to add this information:
- Click on the desired property.
- Drag it to where you want to display the information in the report. If you want to display all the information about the work items in the process, you will need to place this property in the central part. Properties placed in the top or bottom margin will display information for a single work item.
For information: you can select several properties by holding down the “ctrl” key. Then drag them onto the report. - Format the size and location of this information.
- Change the data type associated with the property concerned if necessary.
- Click on the property.
- Click on the gear icon.
- Click on this icon
 in the “Text Format String” field.
 - Update the data type associated with this property.
- Do not select any report item and click the gear icon.
- In the “Properties” field select “XtraReport (Report)”.
- Choose the query you created in the “Data Member” field.
Bind properties to a work item
Now that we have configured our report to display field and property information, we now need to restrict the display to a work item. This configuration will only display information from the executed work item. Follow these steps to configure this restriction:
- Click the database icon.
- Click on “Parameters”, then click on the “+” button.
- Give this parameter a name in the “Name” field and put a description in the “Description” field.
- Choose the “Number (16 bit integer)” type.
- Click “OK” to validate the creation of this parameter.
- Click the arrow icon to the left of “Replica_database1” to view your query.
- Click on the name of your query, then click on this icon
 .
. - Update the query in the “SQL String” part with this information:
select * from “process view name” where number = ?“parameter name”
You must put in the “parameter name” part the name that you put in the third step of this part. - Click “Next”, then “Add”.
- Click the arrow to the left of the parameter name.
- In the “Name” field, put the name chosen in the query in the “SQL String” part. In our example, you must put “pnumber”. The goal is to have the same name as the one used in the query.
- In the “Type” field, choose “Expression.”
- In the “Value” field, click on this icon .
- Click the arrow to the left of “Parameters” and then click the name of your parameter.
- In the “Expression Editor” part put “?“Parameter name””. In our case, we put: “?pnumber”.
- Click “OK”, and then “Finish”.
- Click the “Preview” button.
You can put the number of a work item corresponding to the process in the field corresponding to the name you gave to the parameter. Make sure you choose a work item that matches the view process chosen in your query.
The report editor will then display the configured report with the corresponding work item data.
- Click the “Design” button to return to the editing screen.
- Save your report, exit the Report Editor and return to your Process Editor.
Attach a report to an email template
Now you need to attach this report to an email template. To configure this, follow these steps:
- Go to the Process Editor.
- Click the “Visualization Mode” icon.
- Click on “Message Templates”.
- Choose the desired template or create a new one by clicking on the “+” icon.
- Click the “Attachments” button at the bottom of the dialog box.
- Scroll down, and in the templates section, click the “+” button.
- Click on the “Report” button.
- Choose the name that will be given to this attachment.
- Select the desired report.
- Match the parameter created in your report to the work item number. For that :
- Click on the two arrows icon.
- Add “:” and select the “Number” property.
- Click “Confirm” to validate the addition of the report as an attachment.
For information: If you want to update a report that has already been attached but whose parameters have not been configured in the message template, you must click on “fetch parameters”.
- Click “Confirm” to validate the email template. To learn more about how to configure an email template: Creating email templates and attachments.
When performing a production work item, the values filled in it will be automatically displayed in the report parameters and will appear in the PDF document which will be attached to the email.
For information: Test work item reports do not generate data.
Warning: You can only choose reports that have been edited in the report editor. If you simply created a report without customizing it, it will then be visible in the list of reports but you will not be able to select it.
You can also check this article: Create a report with information of a record and send it by email.