
HEFLO provides an API customization project based on Node.js that enables the implementation of advanced business rules, integrations, and data manipulation during process execution. Using the HEFLO API project, developers can extend process automation behavior beyond standard BPMN configurations. Customizations can be used with:
- BPMN elements;
- External Data Fields;
- Action Buttons;
- Form Field events such as Initialization, Add, Change, and Remove;
- Process execution flow triggers;
- Dynamic participant definition;
- Custom record operations such as creation, update, and removal.
The HEFLO API library also provides built-in helper functions that simplify access to process data, work item fields, records, tokens, and execution context. A complete list of available triggers, events, and helper functions can be found in the HEFLO API documentation: Link.
Although HEFLO customization projects provide the flexibility of a complete web service environment, they also require knowledge of Node.js, project maintenance, hosting, and deployment infrastructure. For organizations that prefer implementation assistance, HEFLO also offers consulting and implementation services.
Note: An alternative approach for a HEFLO API project can be found in the article: HEFLO Integrations Overview: Web Services vs API Customizations
Project structure and minimum elements
A HEFLO customization project is typically implemented as a Serverless Framework application deployed to AWS Lambda. The minimum project structure is:
├── package.json
├── process
├ └── functions.ts
├── serverless.yml
└── tsconfig.json
where each file has a specific responsibility in the project.
package.json
The package.json file defines the project dependencies and configuration. It contains:
- Node.js package dependencies;
- Serverless Framework dependencies;
- TypeScript configuration packages;
- HEFLO API SDK dependency;
- Utility libraries such as Axios, Moment, CSV parsing, and AWS SDK packages.
Example dependency: “heflo-api”: “^1.0.32”
The heflo-api package provides access to the HEFLO execution context and helper methods used during process automation.
serverless.yml
The serverless.yml file defines how the application is deployed to AWS Lambda.
Example:
service: projectName
provider:
name: aws
runtime: nodejs16.x
region: sa-east-1
functions:
function01:
handler: process/functions.function01
events:
– http:
path: /function01
method: post
This configuration:
- Creates an AWS Lambda function;
- Exposes an HTTP endpoint;
- Connects the endpoint to a TypeScript function;
- Enables deployment using the Serverless Framework.
tsconfig.json
This file defines the TypeScript compiler configuration. Example settings include:
{
“target”: “ES2020”,
“module”: “commonjs”,
“strict”: true
}
The project uses TypeScript to improve maintainability, typing safety, and debugging capabilities.
processFunction.ts
The functions.ts file contains the customization logic. Each exported function can be used as:
- Form event handlers;
- Trigger actions;
- API endpoints;
- Sequence flow execution handlers;
- Custom automation routines.
Example:
exports.function01 = async (event: any) => {
const body = JSON.parse(event.body);
const context = new HEFLOApi.Events.WorkItem.OnChanged({ body });
const textField = context.WorkItem.Get(“textField”);
// custom business logic here
};
The main element of every customization is the context object provided by the HEFLO API library. This object gives access to:
- Work item fields;
- Process data;
- Records;
- Participants;
- Current token information;
- Workflow execution methods.
Installing dependencies and prerequisites
Before running the project, make sure the following tools are installed:
- Node.js;
- npm;
- Serverless Framework;
- Ngrok.
For this guide, Visual Studio Code will be used as the IDE for editing, testing, and debugging the project.
The following steps describe a simplified setup process for preparing the development environment and creating the project structure from scratch.
- Download and install Visual Studio Code.
- Download and install Node.js from the official website.
- After installation, validate the installation using a command prompt or terminal:
node -v - Also validate npm:
npm -v - Install TypeScript.
npm install typescript -g - Validate the installation:
tsc -v - Install Serverless Framework.
npm install serverless@3.39.0 -g
Note: Check the official Serverless Framework documentation for the most recent stable version. - Validate the installation:
serverless -v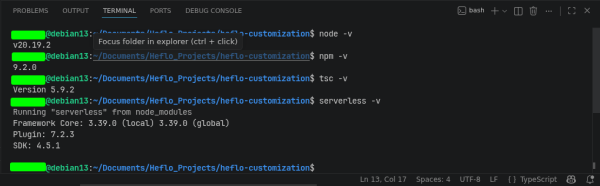
- Install ngrok.
ngrok is used during local development to expose the local API publicly so HEFLO can access the customization endpoints during testing.
a. Create an account on the ngrok website;
b. Download the executable file;
c. Extract and open ngrok;
d. Authenticate the installation using the command provided on the ngrok dashboard.
Example: ngrok config add-authtoken YOUR_TOKEN
After authentication, ngrok is ready to use.
Creating a simple customization function
After installing all prerequisites, we can create the customization project. First, create the project folder, this can be done directly via VsCode or through a terminal, for that:
- Open a terminal and create the project directory:
mkdir heflo-customization
cd heflo-customization - Initialize the Node.js project, for that, run:
npm init -y - Install Project Dependencies.
For this example, we will be installing only the minimal dependencies necessary.
npm install \
heflo-api \
serverless@3.39.0 \
serverless-offline@8.8.0 \
serverless-plugin-typescript@2.1.2 \
typescript
Note: The serverless-plugin-typescript package currently supports Serverless Framework v2 and v3 only. For this reason, the project uses serverless@3.39.0. Installing the latest Serverless Framework version may cause dependency conflicts during installation. To avoid compatibility issues, always install the versions specified in this guide.
Additionally, install the development dependencies:
npm install –save-dev \
@types/aws-lambda \
serverless-plugin-common-excludes \
serverless-plugin-include-dependencies - Create the Project Structure.
A suggested project structure is shown below.
heflo-customization
├── package.json
├── process
├ └── functions.ts
├── serverless.yml
└── tsconfig.json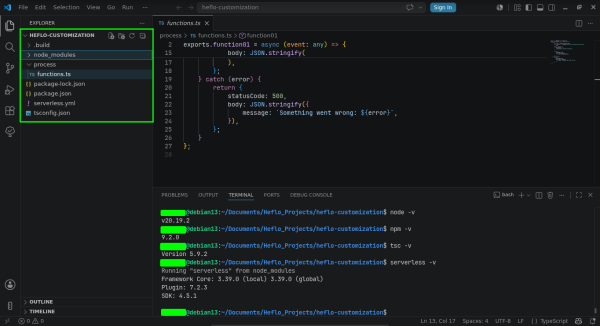
- Create the tsconfig.json file with the following content:
{
“compilerOptions”: {
“target”: “ES2020”,
“module”: “commonjs”,
“sourceMap”: true,
“outDir”: “.build”,
“strict”: true,
“rootDir”: “./”,
“esModuleInterop”: true
}
}
This configuration enables TypeScript compilation compatible with the Serverless Framework and AWS Lambda. - Create the serverless.yml file:
service: heflo-customization
frameworkVersion: ‘3’
provider:
name: aws
runtime: nodejs16.x
region: sa-east-1
timeout: 30
versionFunctions: false
functions:
function01:
handler: process/functions.function01
events:
– http:
path: /function01
method: post
plugins:
– serverless-offline
– serverless-plugin-typescript
– serverless-plugin-common-excludes
– serverless-plugin-include-dependencies
– serverless-dotenv-plugin - Create your first customization function.
Create the file process/functions.ts:
import * as HEFLOApi from “heflo-api”;
exports.function01 = async (event: any) => {
try {
const body = JSON.parse(event.body);
const context = new HEFLOApi.Events.WorkItem.OnExecuteSequenceFlow({
body,
});
context.WorkItem.Set(
“textField”,
“Customization executed successfully”
);
return {
statusCode: 200,
body: JSON.stringify(
context.GetModifiedData()
),
};
} catch (error) {
return {
statusCode: 500,
body: JSON.stringify({
message: `Something went wrong: ${error}`,
}),
};
}
};
This simple example receives the HEFLO event payload, creates the HEFLO execution context based on the event type and updates the process field textField with the following message: “Customization executed successfully”, then returns the modified data back to HEFLO.
Running the project locally
- Start the local server:
serverless offline
The API will run locally on port 3000.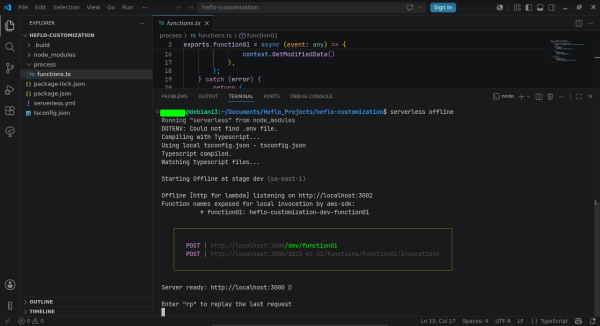
- Open another terminal and run:
ngrok http 3000
ngrok will generate a public HTTPS URL that can be configured inside HEFLO for testing purposes.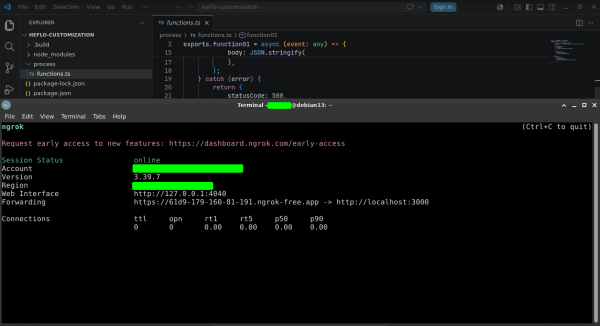
Deploying the customization
After testing locally, deploy the project to AWS Lambda using:
serverless deploy
The deployment process:
- Packages the application;
- Uploads the code to AWS;
- Creates Lambda functions;
- Creates API Gateway endpoints;
- Returns the public API URLs.
Example output:
endpoints:
POST – https://xxxx.execute-api.sa-east-1.amazonaws.com/dev/sampleFunction
These endpoints can then be used directly inside HEFLO automation configurations.
Using the customization in HEFLO automation
After deployment, the endpoint can be connected to process automation events inside HEFLO.
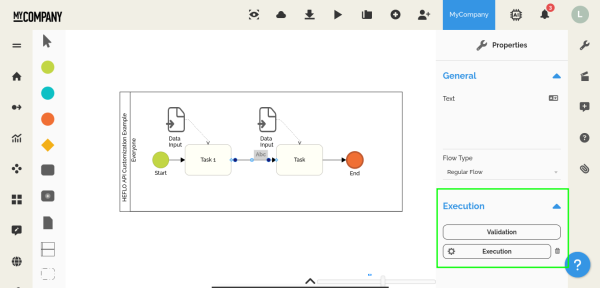
The next step is to create the BPMN process and configure the web service call, for this will be using a simple 2-tasks diagram to send, receive and display the on event on the form field.
- From the HEFLO’s environment main page, access the process editor.
- Open an existing BPMN process, or create one from scratch.
- Check if the process has the Automated process option enabled.
- Add the start element, “First task”, “Second task” and end element as shown in the image below.
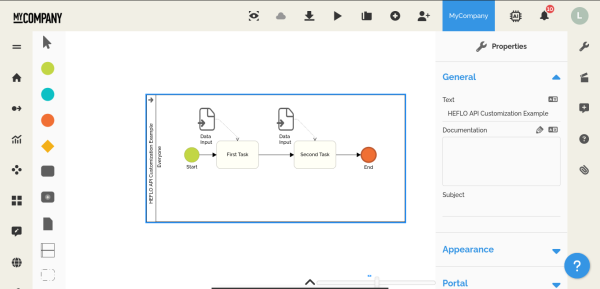
- On both tasks, link a data input (form).
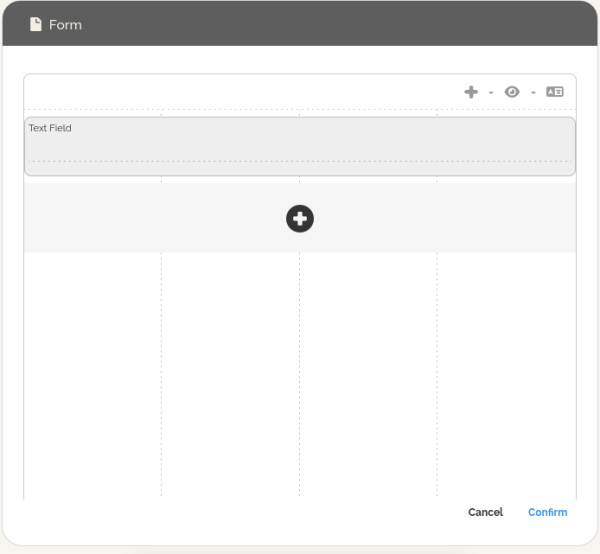
- Double click on the form to access the form creation window.
- On the “First task” task, create a text field called “Text Field”.
- Here we need to take an additional step and for that, we have two possible approaches:
a. The first is to use the field identifier to map the form field inside the application, for this:
i. Click on the pencil icon on the right side of the field and select the option Edit.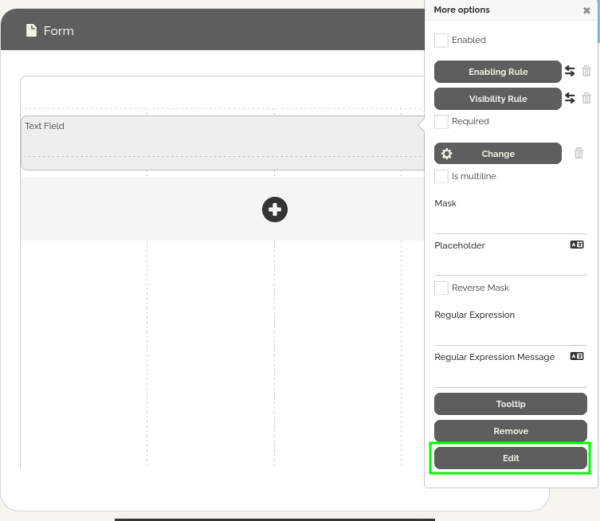
ii. At the bottom of the window, click on the icon “</>” to access the field identifier and replace field_id on the lines like:
context.WorkItem.Set(“textField”,);
To map the field inside the application.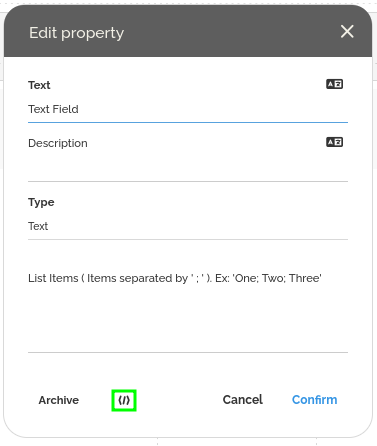
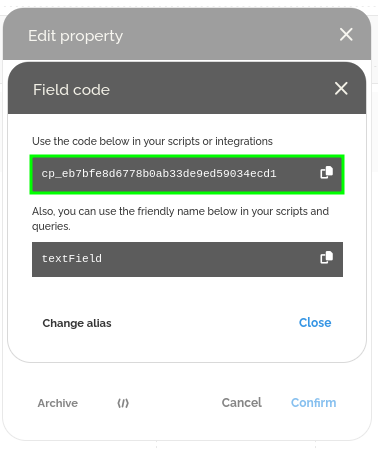 b. The second is to create custom alias, this keep the API code simpler and maintainable, for that:
i. Click on the pencil icon on the right side of the field and select the option Edit.
ii. At the bottom of the window, click on the icon “</>” to access the field identifier
iii. Select the option to create alias and confirm
iv. Use these in place of field_id on the lines like:
context.WorkItem.Set(“textField”,);
To map the field inside the application.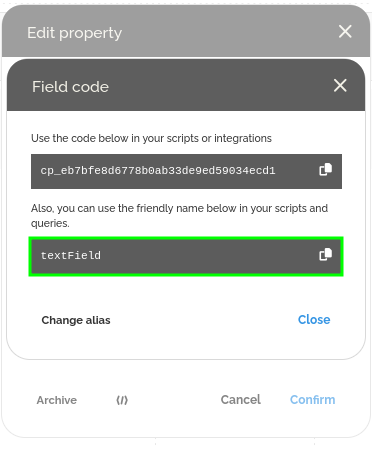 Using the second approach, create the following alias for the text field, this must be the same used in the code.
Field: Text Field Alias: textField; - Now it’s time to configure the api call, select the execution flow between the two tasks and on the execution tab (properties menu), click on the execution button.
- On type of customization, select API using NodeJS.
- Here we need to configure the web service call. For this example, create a new web service and set:
a. Production URL: https://abcd-1234.ngrok-free.app/
b. Resource: function01
c. Method: Post
d. Authentication: None
Where the production url must be the same shown in the ngrok terminal.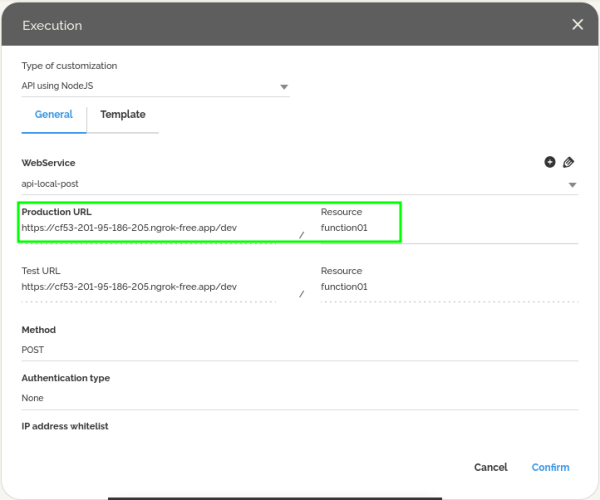
Note that we do not need to configure any sending and response parameters, all the information will be manipulated inside the application and sent to the HEFLO environment inside a context. - Confirm the configuration.
- Save the configuration.
- On the editor, right-click on the start element and select Test, then Start new work item.
- Validate the configuration.
An interesting point is that this small project can be further adapted to model complex business rules and be a starting point for future projects. Another common usage scenarios include:
- Field change events;
- Form initialization;
- Action button execution;
- Sequence flow execution;
- Approval validations;
- Dynamic participant assignment;
- External integrations.
The customization endpoint receives the process execution context from HEFLO and returns the modified data to the platform. This approach enables the implementation of advanced business rules while keeping the BPMN model clean and maintainable.
Final Considerations
HEFLO API customizations provide a powerful extension layer for process automation projects. By combining BPMN process modeling, Node.js customization and Serverless deployment; organizations can implement highly flexible and maintainable automation solutions.
The HEFLO API library simplifies process interaction and allows developers to focus on business logic instead of infrastructure details.